

Easy come, easy go...
/Here’s some Apple humour for you as the weekend draws nearer!
Easy come, easy go…
(Via Faildesk)
Apple and technology news with Setup Sync & Learn in Sydney and Perth.
Please note: BLOG articles below were relevant and correct at time of posting, but due to technology changing so quickly these features and instructions may no longer be relevant in current operating systems and app versions. Please contact us if you have any questions here
Here’s some Apple humour for you as the weekend draws nearer!

(Via Faildesk)
I want to talk about some of my favourite technological advancements that are increasingly becoming functional and fun! Of course other companies have their own take on this, but I’m particularly focused on how Apple is doing it.
Read MoreEver stepped over to the dark-side out of curiousity? Like…to Android? Only to realise that you really miss Apple’s user friendly and uncomplicated iOS? Then, while crawling back solemnly you realise you’ve forgotten your Apple ID and password. It’s okay! All is forgiven and not all is lost. Here’s how you can find your Apple ID Email Address and return yourself to the light-side.

Go to the Apple ID Recovery page here
Type in your First Name and Last Name - if you think you’ve used a shortened name ie. David/Dave or Robert/Rob, you will have to do separate searches
Enter the email address you want to look for - if you do have multiple emails you may have to try this a few times
You may find yourself repeating those last two steps a few times until you can find a match
Once you’ve successfully recovered your account you should be able to reset your Apple ID password (you’ll need to remember your security questions though!)

Hope this is helpful for your return to the light-side. For my tips and tricks follow us on Facebook or even give us a shout if you’re looking for support and training on your Apple products!
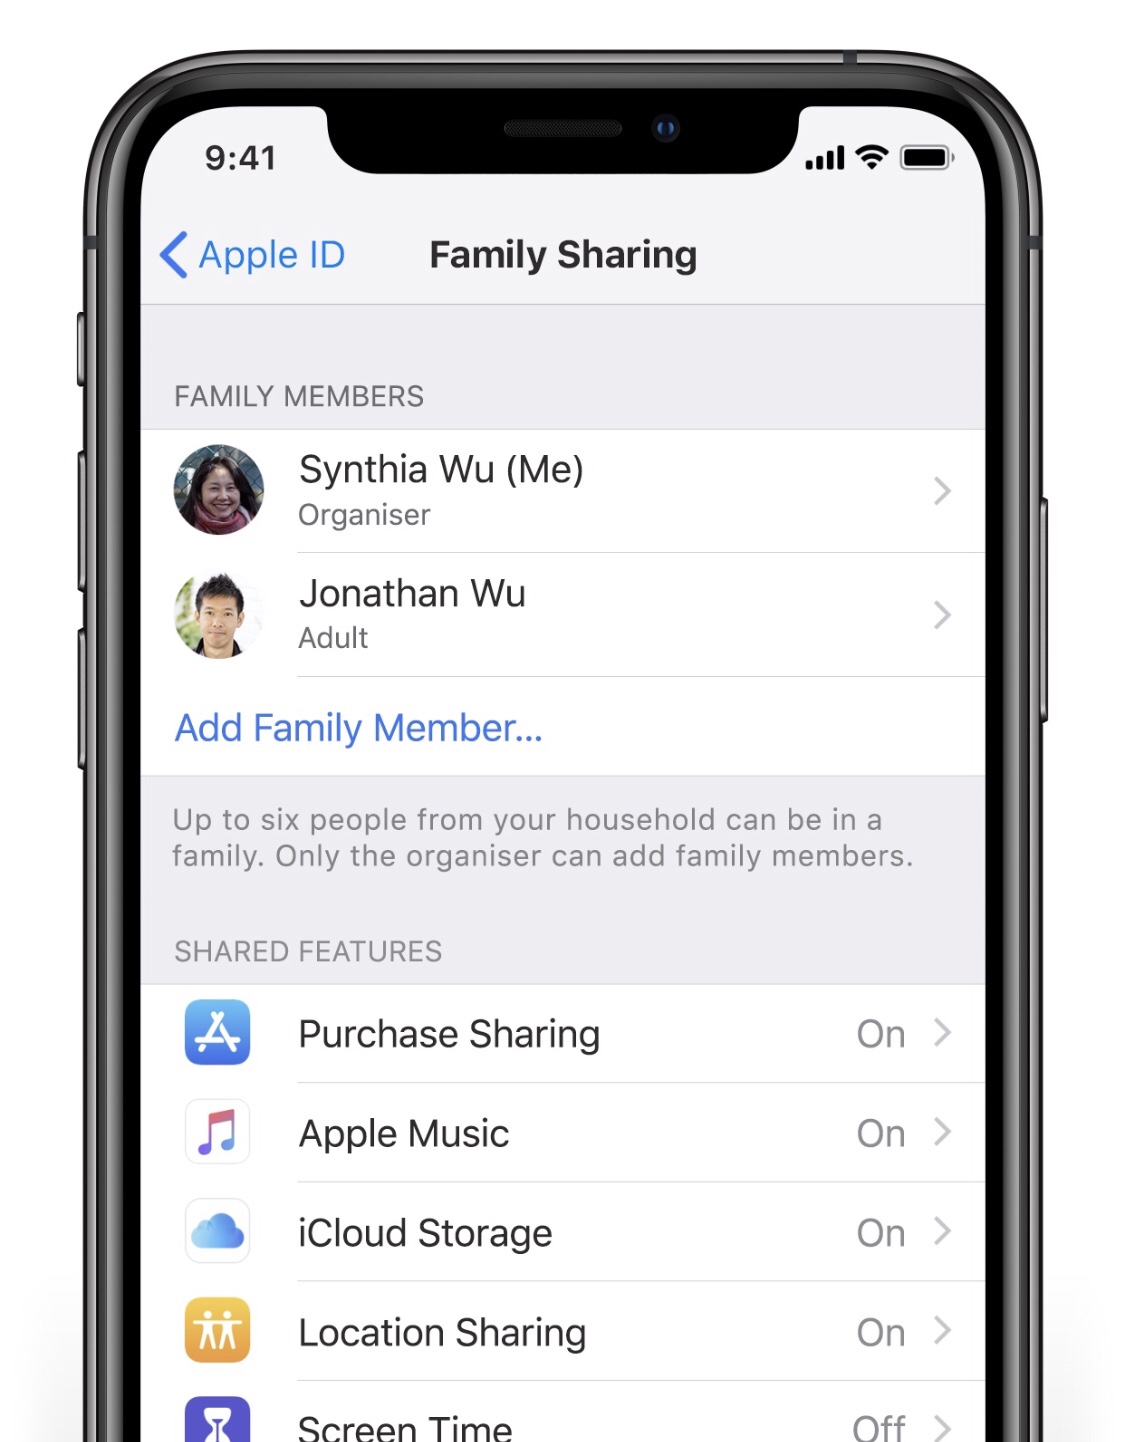
Having extra iCloud storage is great, but it’s greater when you can share it with family! To share a single iCloud plan with your family go to Settings > Your Name > Family Sharing, choose a plan and members from your fam!
Here’s a quick tip from Apple to have all your photos on all your devices. To see all your photos sync on your iOS device and Mac (via Photos app) go to Settings > Your Name > iCloud > Photos and turn on iCloud Photos.

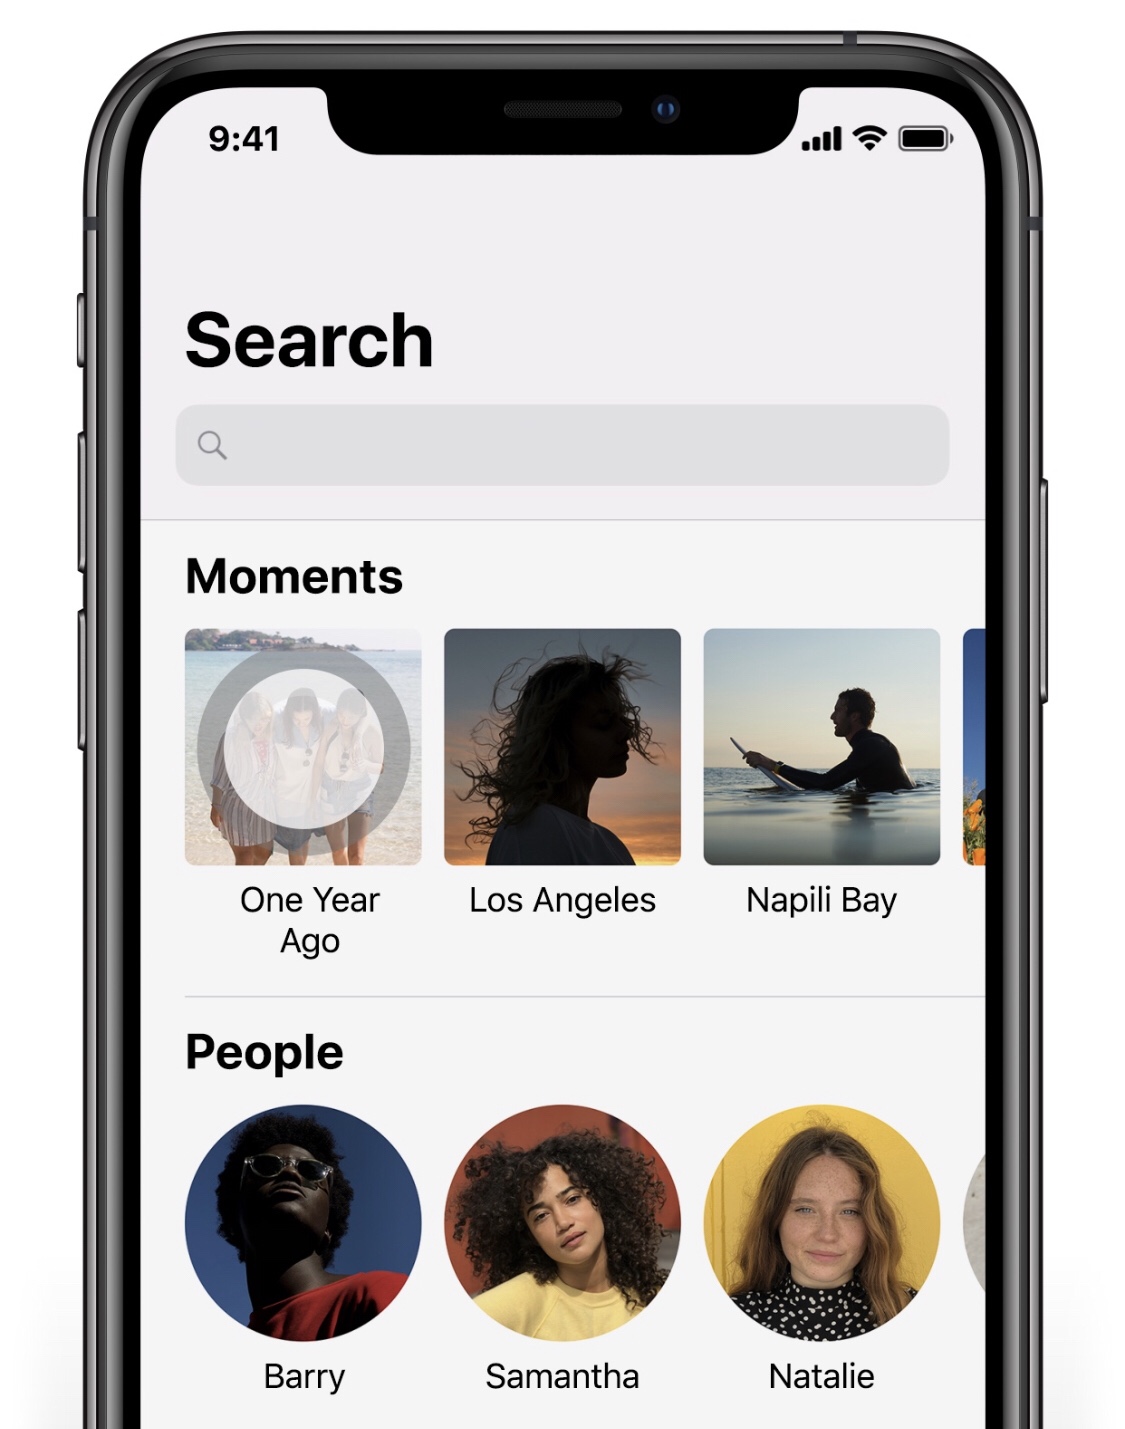
Did you know you can use Moments to reflect on photos taken a year ago? What to know what your were doing a year ago on this day? In Photos tap on Search then tap on One Year Ago. Try it now!
With the fall season approaching fast (in the US) we are getting closer to Apple’s release of its new OS Catalina. There are a lot of new features coming through, such as Music, TV, and Podcasts. You’ll also be able to enjoy your iPad apps on your computer instead too! There’s also been improvements to familiar apps such as Photos, Notes, Reminders and Safari. The feature I’m looking most forward too is Sidecar which enables you to use your iPad as an extension of your desktop! Check out all the features of Catalina in further detail on Apple’s website!

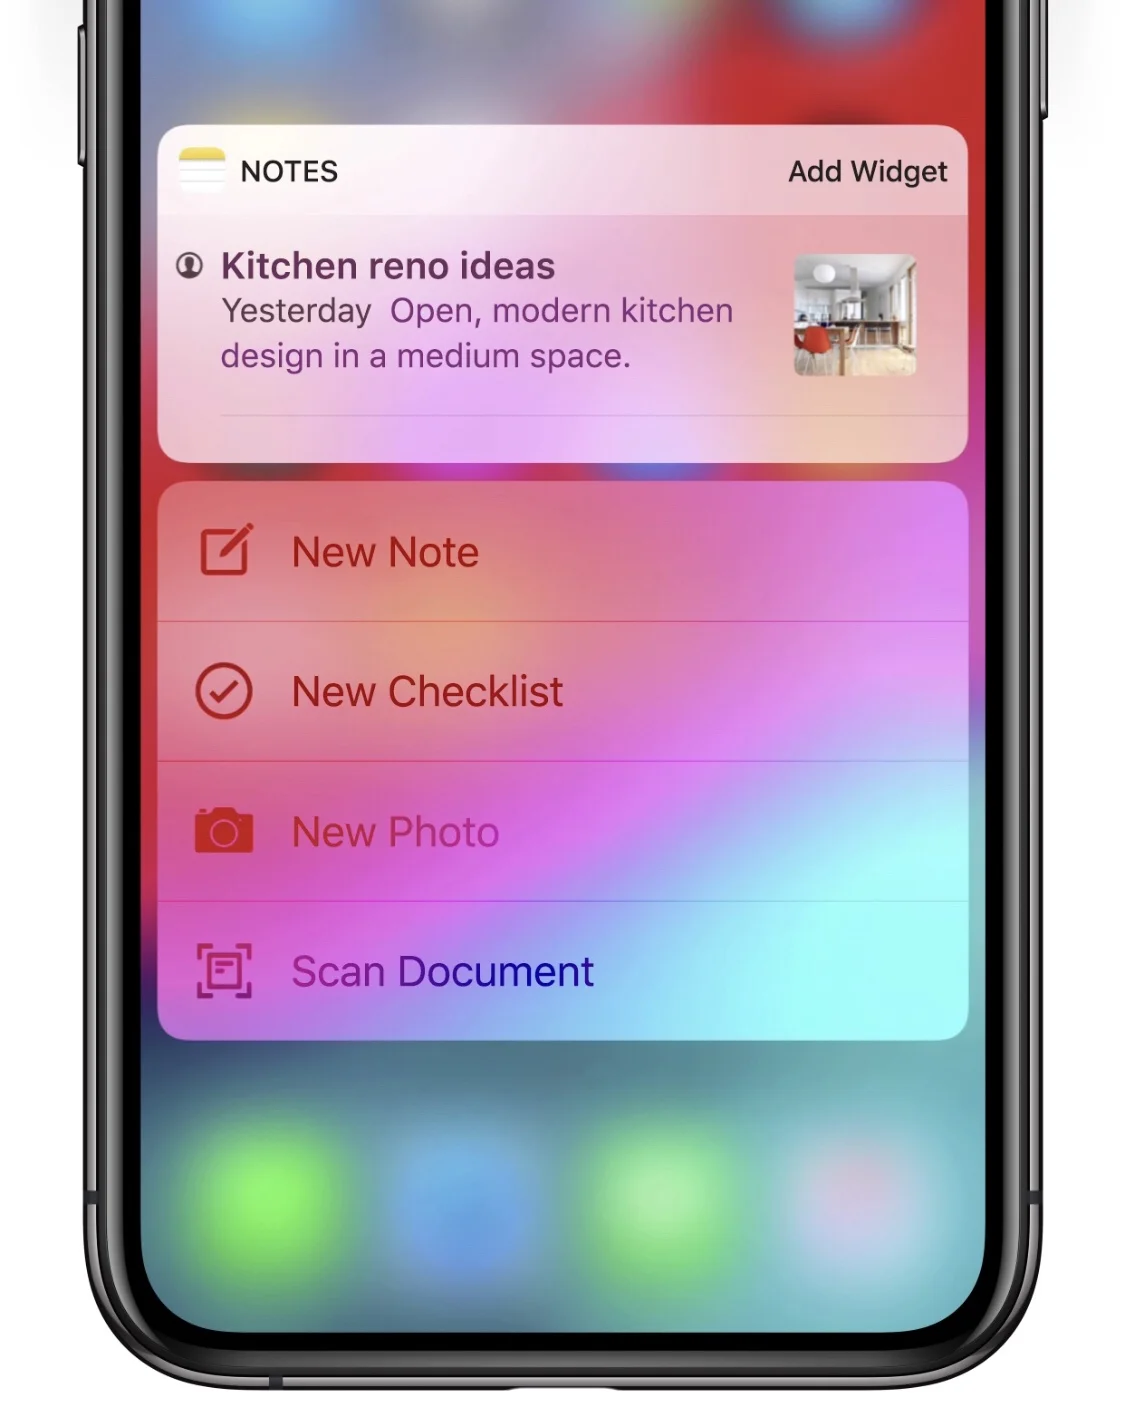
Here’s a quick tip straight from the essentials of iOS! You can access your favourite App with just a swipe to the right and view its widget in your Today view. To add an App, find its icon, press down on it (with the 3D Touch), then tap on Add Widget.
Now you’ll be able to quickly view the App from your Lock Screen by swiping right!
Sometimes you’re on a call and then someone else might walk in and want to start discussing something important, but then you may not want whoever is on the phone listening. Or you could be listening to that friend of yours venting, but secretly you’re watching Netflix in the background so you don’t want them to hear that background noise…okay, I’m kidding. We’re not that kind of friend. A friend must always be actively listening! But here’s how you mute yourself in a call. Just tap the mute button!

Do you find yourself anxiously waiting for a reply to an important email? Well, there’s no need for constant checking and refreshing of Mail. Here’s a quick tip on how to be notified of a reply. When you are viewing a message tap on the flag icon at the bottom then tap on “Notify Me…” Voila!

We all have opinions, but sometimes we just want to enjoy ourselves without having to give feedback. So here’s a quick tip on how to stop those annoying rate and review pop-ups from apps that you’ve been using.
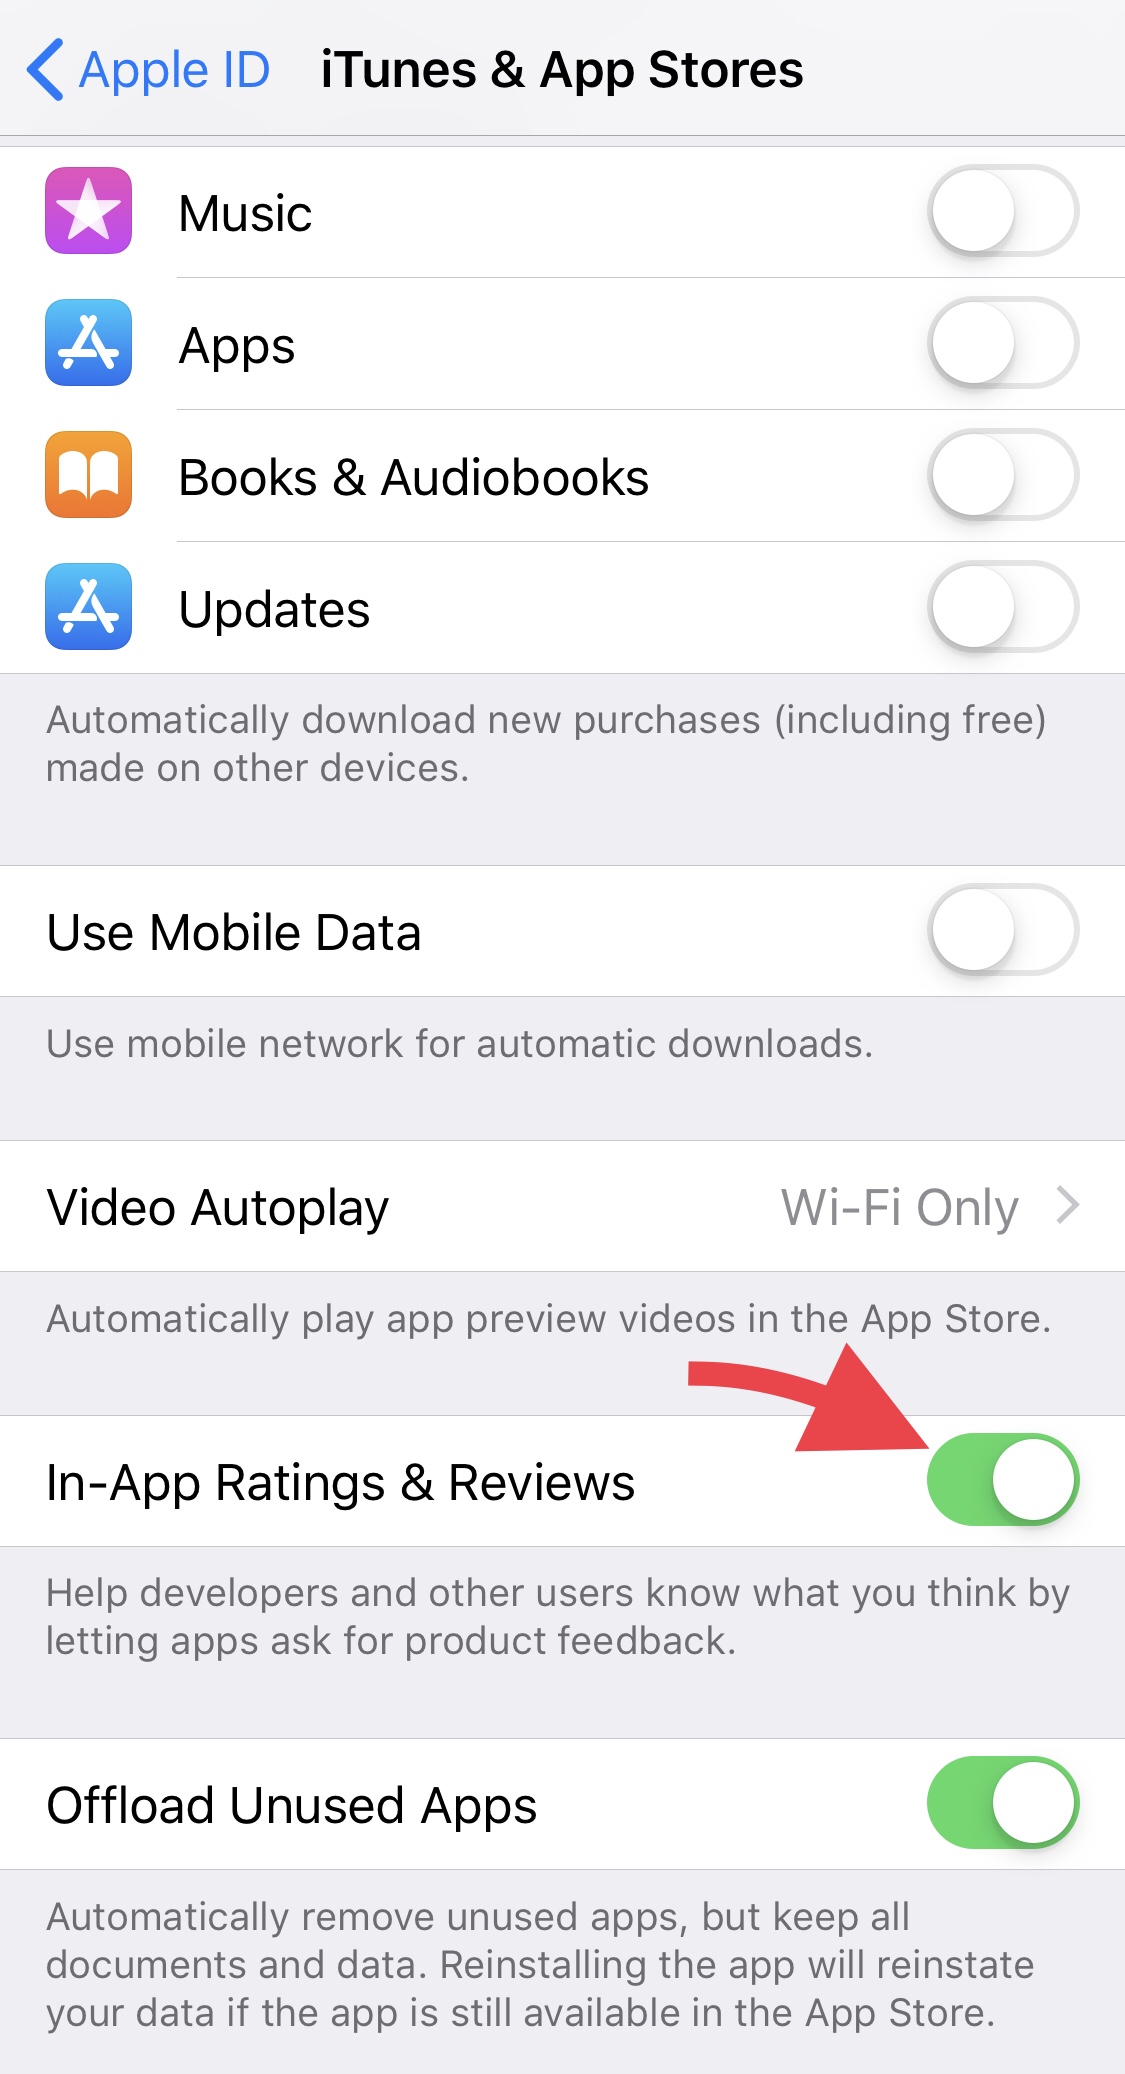
Here’s where to go to disable those feedback requests!
Settings > iTunes & App Store and then tap the switch to toggle off In-App Ratings & Reviews.

Did you know the Screen Time feature on your iPhone and iPad does more than just track how long you spend on various apps? Here’s a little hack on how you can use Screen Time as a way to password protect your apps…although I admit it just has one wee flaw.
Firstly, you’ll need to make sure you have Screen Time enabled by going to Settings > Screen Time and then set a passcode by tapping on Use Screen Time Passcode.
Now you’ll need to set a time limit for the apps you want to lock. What we are trying to do is set a minimum time limit so that the app will lock straight away (the minimum limit is 1 minute - this is the one flaw, as you’ll be “unprotected” until the app has been used for 1 minute).
To add a time limit to to an app, tap on the bar graph that shows your current day’s usage. Find the app you want to add a limit to in the list and tap on it. Next, tap on Add Limit and enter the passcode you set earlier in Screen Time. Set it to 1 minute and make sure you have enabled Block at End of Limit. Now tap on Add. Voila! Now after using your app for 1 minute it will lock - the icon will be greyed out on your home screen. When you tap on the greyed out icon you’ll get this message, “Ask For More Time” which you just tap on and enter your Screen Time passcode to unlock.
So, there you have it! A little Screen Time hack to “Password Protect” your apps!
If you haven’t already, it’s a good time to update your Mac to Apple’s latest OS X Mojave (check if your Mac is compatible here). One of my favourite features is Mojave’s dynamic desktop. Now, it’s not a “life-changing” feature, but more of a fun novelty. Based off your location, your desktop background will change accordingly to the time of the day - so you’ll see a progression from day to night. Pretty cool right?
Curious? Here’s how to enable Dynamic Desktop for you Mac…

…and you’re done!
You can also find and download more dynamic desktops online, or if you’re adventurous enough, make your own. I hope you find this feature just as interesting as I do!
So, today I forgot the pin to my new debit card, and just as well, we sometimes forget the password to our Apple ID. But there’s no need to be standing at a till all flustered and embarrassed, here’s how you can easily reset your Apple ID…

Step 1: In Safari, go to https://appleid.apple.com then click on either “Forgot Apple ID or Password?”
Step 2: On the next page you’ll need to enter your email address that’s linked to your account. From there click “Continue” and then select “I need to reset my password.”
Step 3: From here you have two options to how you can reset your password, 1) by email or 2) by answering a set of security questions. Note: If you have two-factor authentication on your screen will look a little different.
Step 4: If you choose to reset your password via email you will be sent instructions to your primary email address or your rescue email address if you have one set up. The email will be sent when you see a page with a green tick and a big, “Email has been sent.” If you can’t find the email instructions check your Spam, or Junk folders just in case. Otherwise you can go to the other option of answering your security questions.
But what happens if you’ve forgotten the answers to your security questions? It’s okay, it’s not the end of the world.
Step 1: Go to iforgot.apple.com and fill out all the necessary details then click on “Continue”
Step 2: On the next step select “I need to reset my security questions” then click “Continue”
Step 3: Type in your password then click “Continue”
Step 4: Choose your three questions using the drop-down menus and type in your answers for each one. Make sure that these are questions that only you would know the answers to! Well hopefully they are. Click on “Continue” and you’re done!

If two-factor authentication is enabled…resetting your password is easier because all you need is either your trusted iPhone, iPad, iPod Touch, that have Passcodes enabled or you can also reset from your Apple ID account page.
Step 1: Go to “Settings > Your Name > Password & Security”
Step 2: Tap on “Change Password”
Step 3: Enter your pass code when prompted then enter your new password
Step 1: Go to iforgot.apple.com and enter your trusted phone number used to set up your two-factor authentication
Step 2: Select Continue and you’ll receive a notification to your trusted iOS device
Step 3: Once you’ve received the notification on your iOS device, select Allow
Step 4: Follow the next few steps then enter your pass code. Reset your password!
All done! Now, if you’re still finding it difficult to reset your password, don’t forget that you can get in touch with us via our contact page. If you’re in Perth or Sydney we can come directly to you and help you out as well!
Okay, let’s be honest here, we’re all a little bit aware that we tend to forget our passwords especially with so many multiple logins. The good thing is that Apple has made it easier for us by giving us iCloud Keychain, which helps to store our usernames and passwords safely.

If you want to view your stored passwords in your Keychain simply go to your Settings > Passwords & Accounts > Website & App Passwords. Once you’ve confirmed your ID with either Touch/FaceID you’ll be able to see your full list of login info.
If this isn’t working for you, check that you have Autofill Passwords enabled. Settings > Passwords & Accounts > Autofill Passwords. Check that you have iCloud Keychain enabled as well.
How easy is that? No more trying to scramble your brain remembering multiple logins and passwords. There are many other apps that can help you with password management. I myself personally use 1Password. It’s a great little app that stores not only just your login details, but also other things such as your bank details, membership card details, credit card details. The sky’s the limit with what you want to store in it. You can check it out here on the app store. If you’re not a fan of a paid subscription though, there are also free alternatives. Explore Apple’s App store and see what you’ll discover!

At Setup, Sync and Learn your security and privacy is always important. It’s always good housekeeping to change your password at least once or twice every year. It does seem straight forward, but at times you might find yourself getting numerous notifications on your devices to sign-in again. So to make it a little less stressful for you here’s a short list of what to check after you’ve changed your Apple ID or Password…
Update your Apple ID and password on your iPhone, iPad, iPod touch, Mac, and PC.
Go to Settings > (your name) > iTunes & App Store.
If you're signed out, enter your updated Apple ID and password.
If you're signed in with your previous Apple ID, tap your Apple ID, then tap Sign Out. Then enter your updated Apple ID and password.
Go to Apple’s website.
Click on the Shopping Bag icon, then click Account.
In the Account Settings section, click Apple ID and password.
Enter your updated Apple ID and password.
You will also have to update your login details by Signing Out then Signing back in to other apps such as FaceTime, iCloud, Find my iPhone, etc.
Click on this link to see a full list and instructions from Apple Support on what to do…
Some of Reece’s favourite features in new iOS 12 from Apple.
Read MoreVote for us in the North Shore business awards
Read MoreAs you may have already heard Apple will be releasing iOS 12 soon. Here are 10 features to be looking forward to in the upcoming update…
1. Turn yourself into an animated emoji! (for iPhone X) You saw Apple introduce Animojis in it’s last update, but now you can create a personal animated emoji called Memoji!
2. Group FaceTime. Finally! You’ll be able to FaceTime multiple people at once. The new update will be able to support 32 people in one FaceTime call.
3 Siri just got smarter. Siri will also be seeing a significant update in iOS 12. She’ll be able to answer a larger variety of questions, even about famous people, and is integrated with more third-party apps.
4. Screen Time. This new feature is part of the comprehensive set of time management and focus tools in the new update. This feature provides repost on your weekly activities based off how you use your device. This includes how much time you spend with individuals apps, how often you pick up your phone and the duration you spend on your iPhone or iPad. You can also set a time limit on specific apps as part of the new Parental Controls.
The iOS 12 update introduces a comprehensive set of built-in features designed to help you focus, limit distraction, monitor your iOS device usage, and get a better understanding on how you're using your time throughout the day. (Source: MacRumours)
5. Do Not Disturb. There are two new updates to Apple’s Do Not Disturb feature. There will be one for bedtime, allowing you to turn off notifications at night, only being able to see the time, and you can also control it’s ending time. You will also be able to control the duration of Do Not Disturb while at a particular location or in a meeting.
6. Grouped Notifications. This feature has been added into the new update to make viewing and managing notifications from a single app easier.
7. Improved Privacy and Security. One of the new features you’ll be seeing in iOS 12 is strong password suggestions. It’ll also be able to let you know if your password is weak or strong.
8. Multiple Faces in Face ID (for iPhone X). An update that you may have not heard is the ability to “Set Up An Alternative Appearance.” This may be for people who may want more than one face to unlock a phone, like a couple who shares their phone perhaps?
9. Face ID Rescanning (for iPhone X). If you’re like me and sometimes get frustrated when the Face ID doesn’t recognise your face straight away, there fore having to lock and then unlock your phone again to rescan, the new update takes this issue away. Instead, to re-initiate the scan, your just have to swipe up from the bottom of the phone.
10. Battery Info. Finally, after much beta testing, the new iOS 12 will see a more comprehensive way of viewing your battery’s information. With a detailed usage chart you’ll be able to see usage data from the last 24 hours or the last 10 days.
So with these updates coming soon to your iDevice, I hope you’re just as excited as we are. These are just the few features coming soon as there is plenty more!

Ever wanted to learn more about using your Apple iPhone or iPad?
Come along to a free 1 hour session with an Apple expert, in a relaxed group environment at a great café!
Read MoreSetup Sync & Learn specialises in all Apple devices - help for setup, troubleshooting, and teaching technology in everyday language.
One on one or small group tailored training in the comfort of your own home or office. On-site help available in Sydney NSW and Perth WA.


My highlights from latest Apple Event September 2024