SSL Blog
Please note: BLOG articles below were relevant and correct at time of posting, but due to technology changing so quickly these features and instructions may no longer be relevant in current operating systems and app versions. Please contact us if you have any questions here
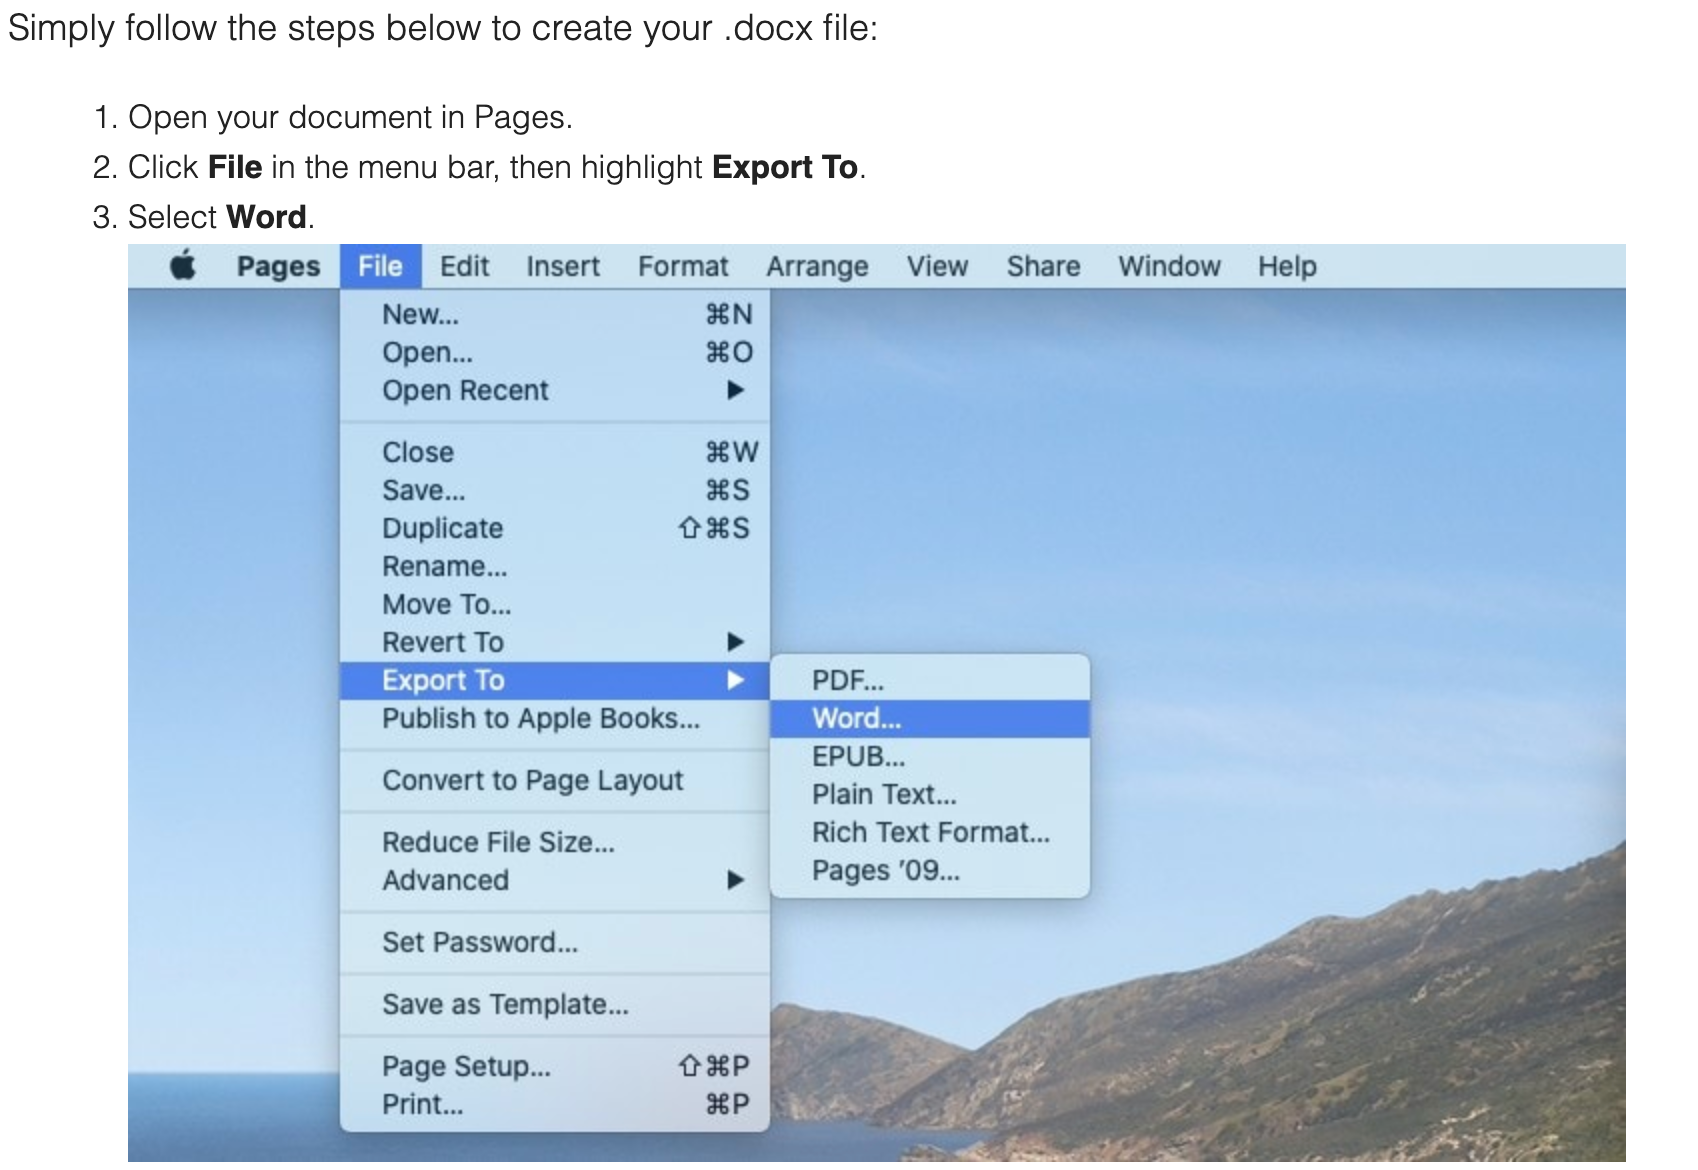
How To: Export your Pages document as a Word document.
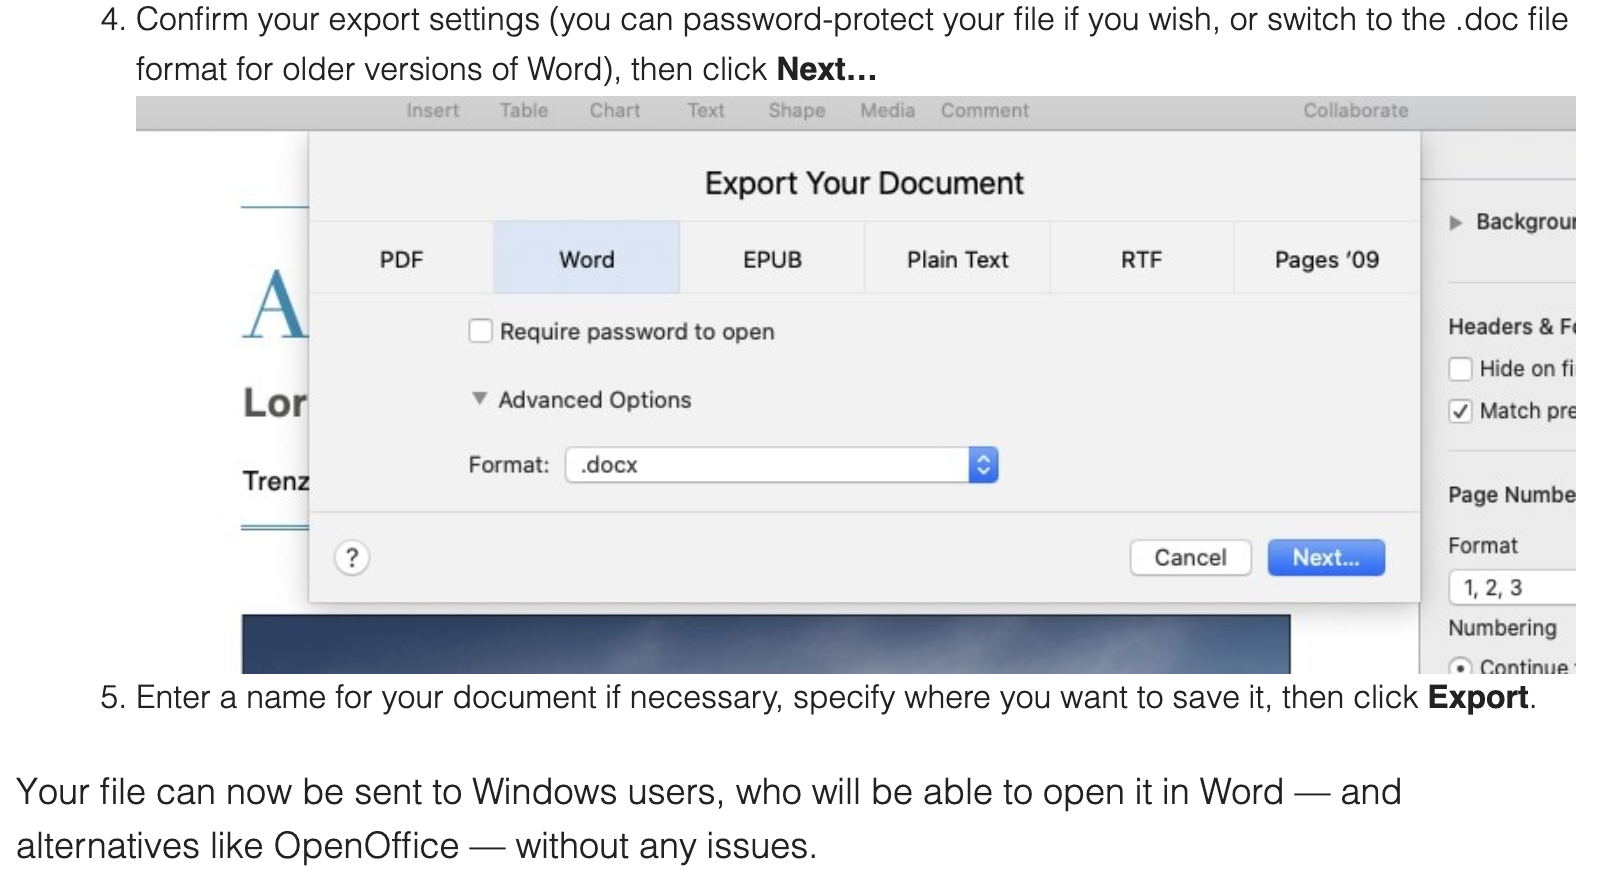
Not everyone owns a Mac and when it comes to sharing documents it can become quite a hassle if you’re sharing it with someone who only has Microsoft Word. The good news is, Pages is Word friendly! Unlike Microsoft Word that can’t open Pages documents, Pages can both read and export .docx files! Here’s how you can export a Word friendly document for your Windows wielding friend thanks to the smart fellows at Cult of Mac.
iOS Quick Tip: Undo/Redo
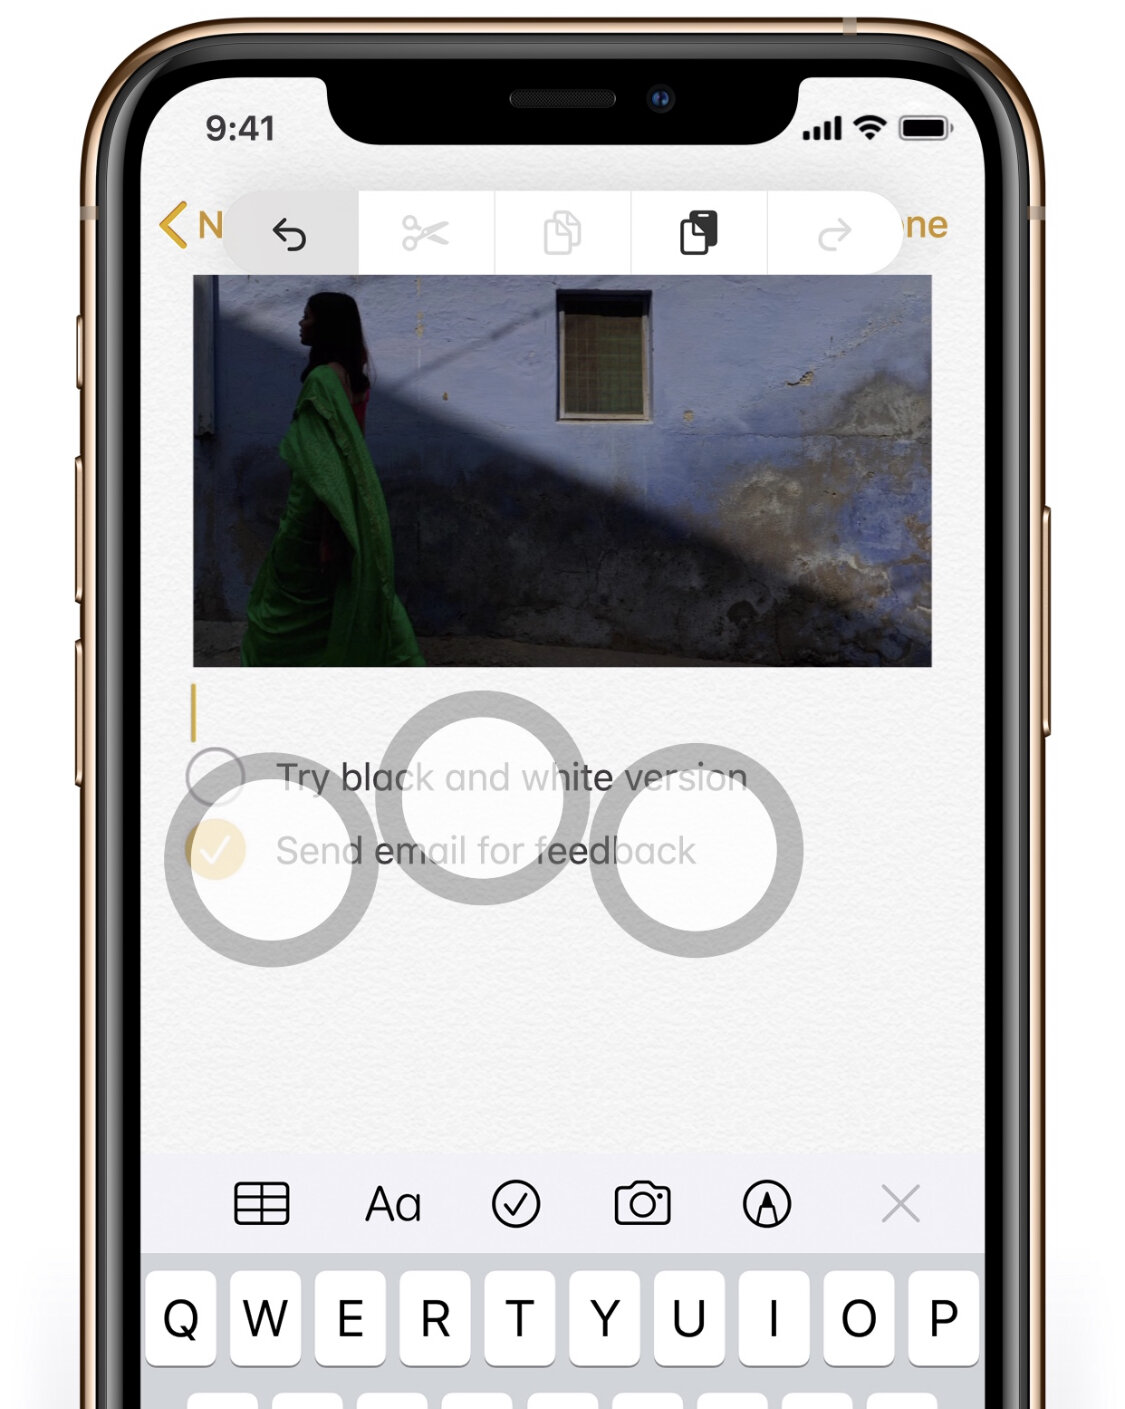
Here’s a quick tip from Apple if you’ve made a mistake in Notes or in iMessages, etc. With three fingers, swipe left to UNDO. Swipe right if your want to REDO.
iOS Quick Tip: Saving Email Drafts
Here’s a quick tip for you and your iPhone or iPad when sending emails from the geniuses at Apple. Need to quickly save an email draft? While writing an email, simply swipe down on the little anchor point at the top of that message. To retrieve it again just tap on the draft at the bottom.

iOS Quick Tip: Scroll Bar
If you’ve updated to the new iOS you might’ve noticed a new scroll bar while navigating through a page in Safari. Not only is it useful for seeing where you are on a page you can now use it to scroll faster! Have a crack at it by normally scrolling through a page, then tap and hold the scroll bar on the right and drag it up or down to scroll through the page. Also the faster you move the scroll bar the faster you will scroll through the page!

Quick iCloud Tip: Family Sharing
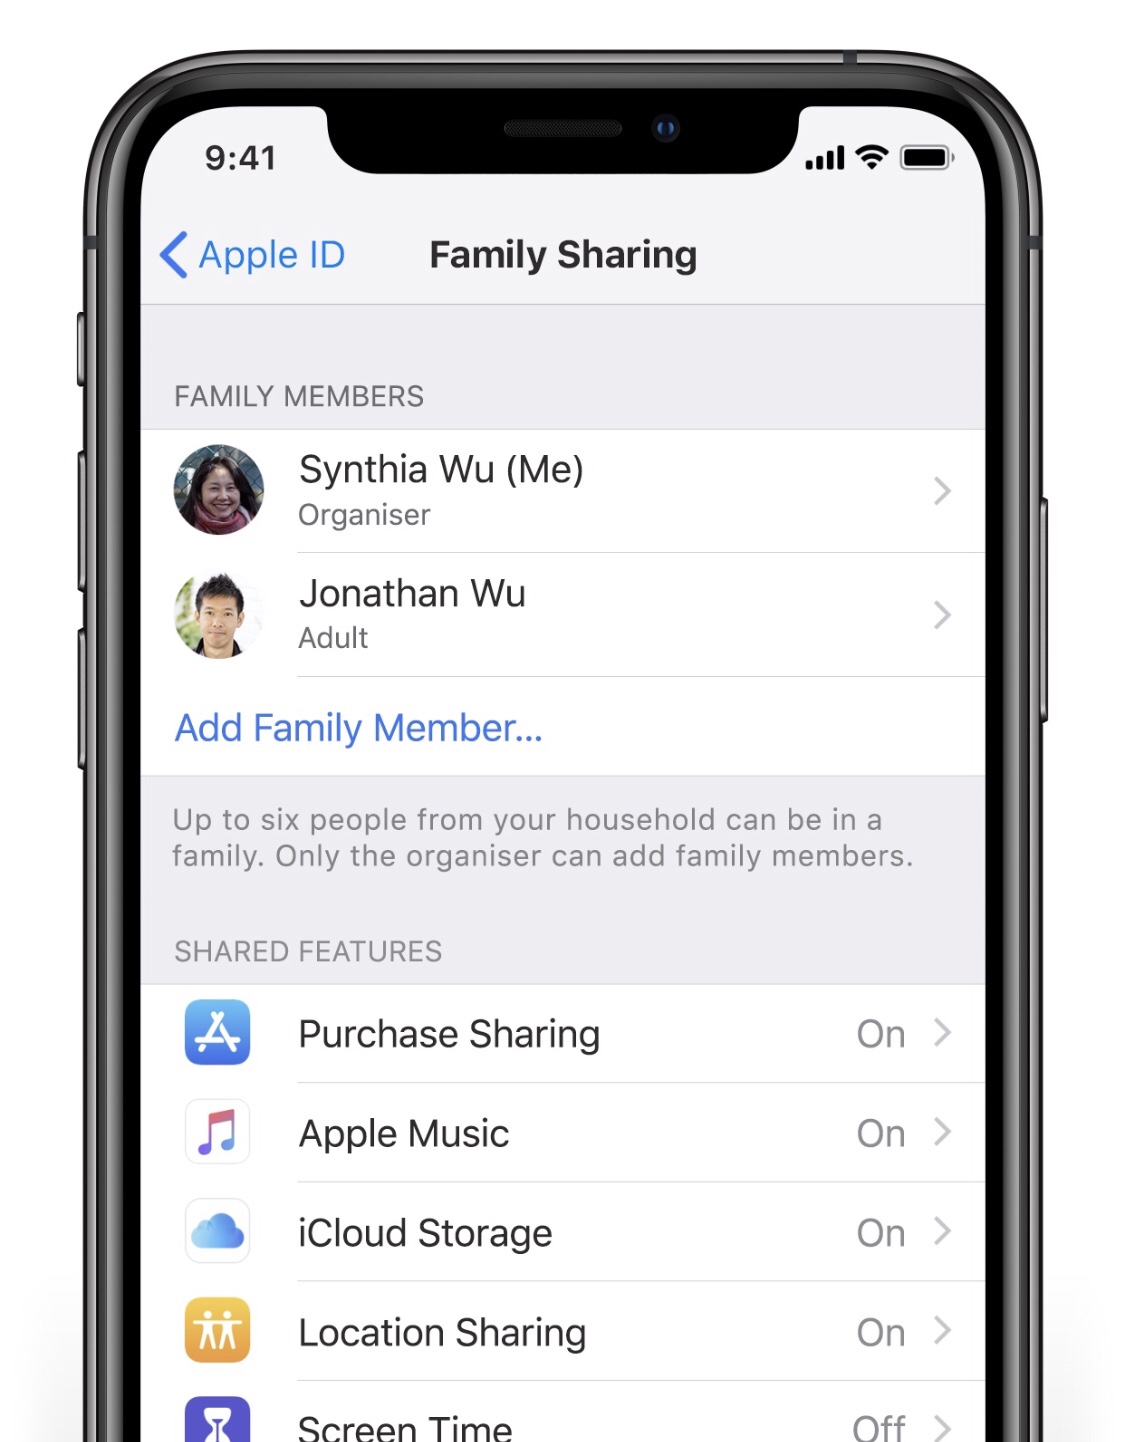
Having extra iCloud storage is great, but it’s greater when you can share it with family! To share a single iCloud plan with your family go to Settings > Your Name > Family Sharing, choose a plan and members from your fam!
Quick iOS Tip: Photos everywhere!
Here’s a quick tip from Apple to have all your photos on all your devices. To see all your photos sync on your iOS device and Mac (via Photos app) go to Settings > Your Name > iCloud > Photos and turn on iCloud Photos.

Quick iOS Tip: Access your favourite app with a swipe!
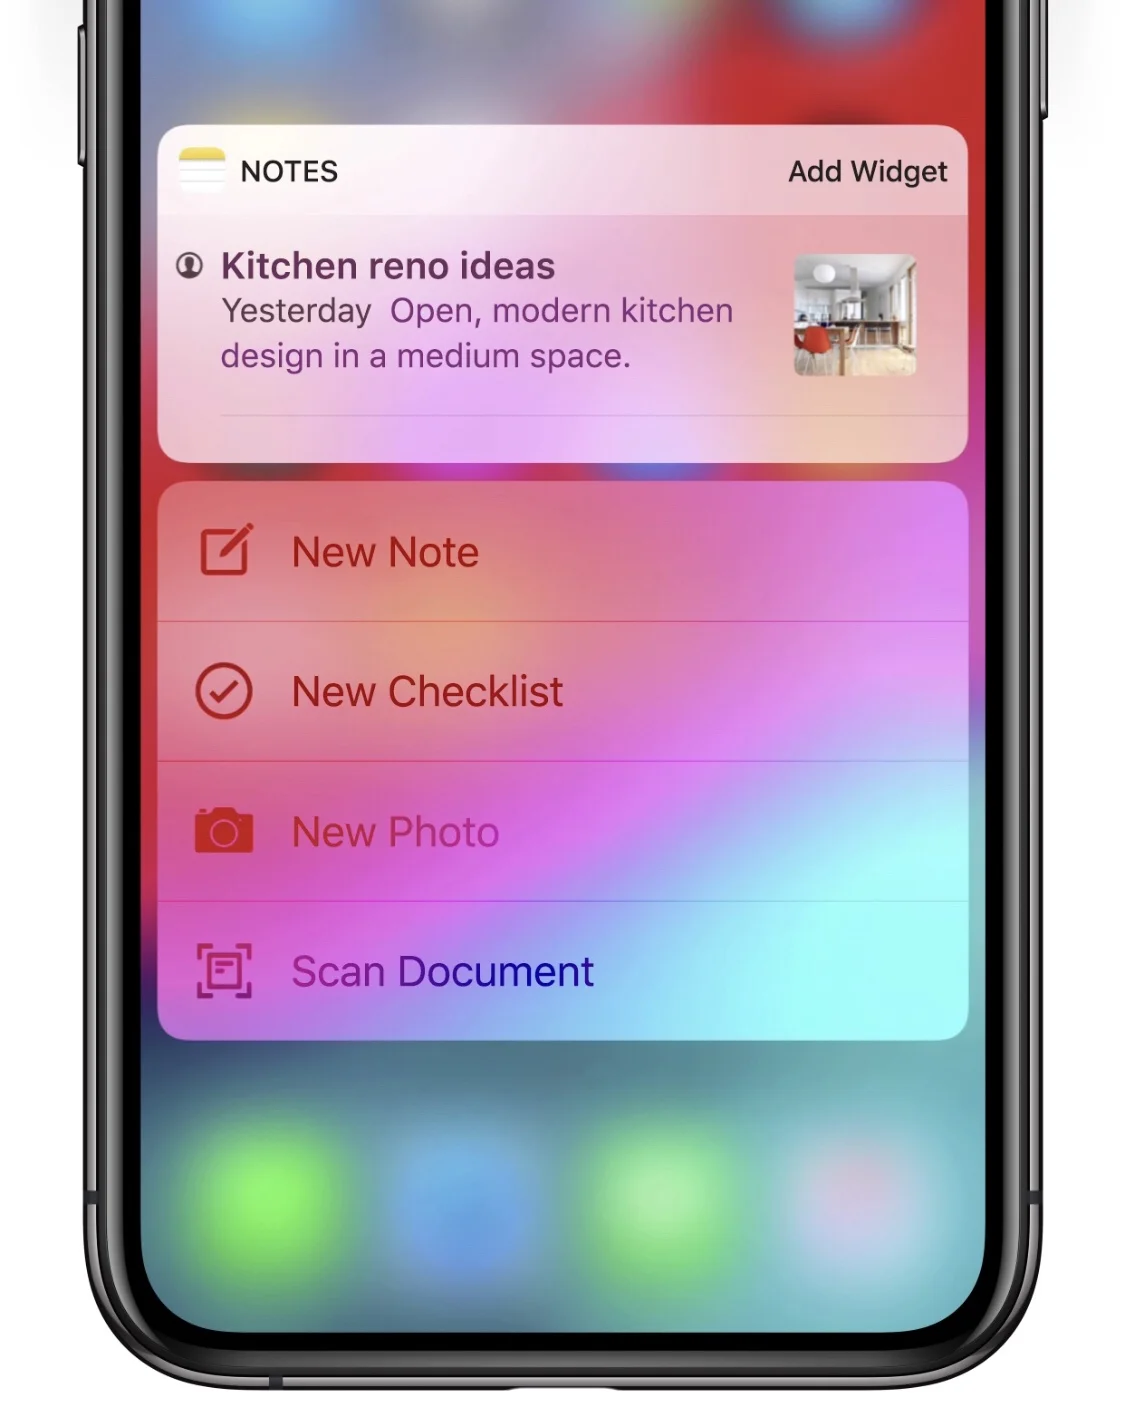
Here’s a quick tip straight from the essentials of iOS! You can access your favourite App with just a swipe to the right and view its widget in your Today view. To add an App, find its icon, press down on it (with the 3D Touch), then tap on Add Widget.
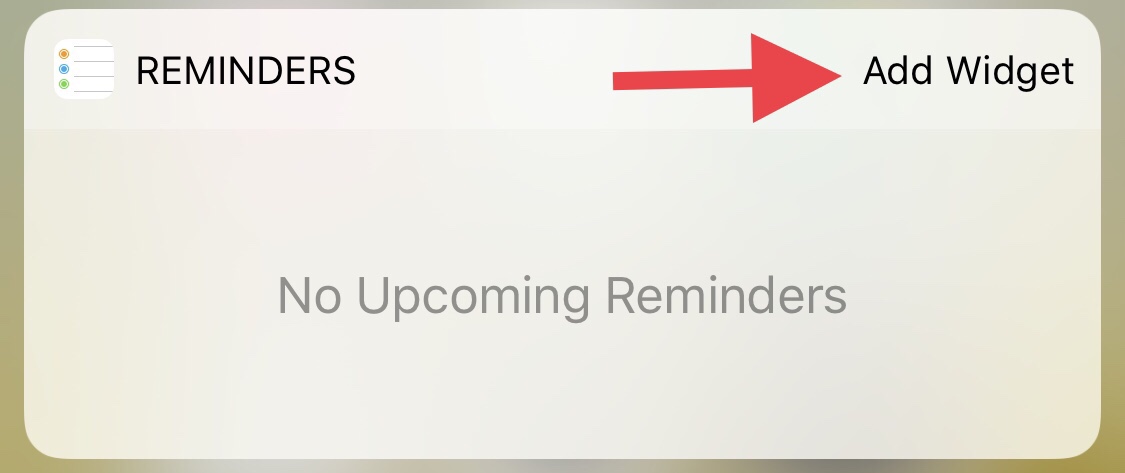
Now you’ll be able to quickly view the App from your Lock Screen by swiping right!
Quick iOS Tip: I’m still listening!
Sometimes you’re on a call and then someone else might walk in and want to start discussing something important, but then you may not want whoever is on the phone listening. Or you could be listening to that friend of yours venting, but secretly you’re watching Netflix in the background so you don’t want them to hear that background noise…okay, I’m kidding. We’re not that kind of friend. A friend must always be actively listening! But here’s how you mute yourself in a call. Just tap the mute button!

Quick Tip: How to stop those pesky rate and review requests
We all have opinions, but sometimes we just want to enjoy ourselves without having to give feedback. So here’s a quick tip on how to stop those annoying rate and review pop-ups from apps that you’ve been using.
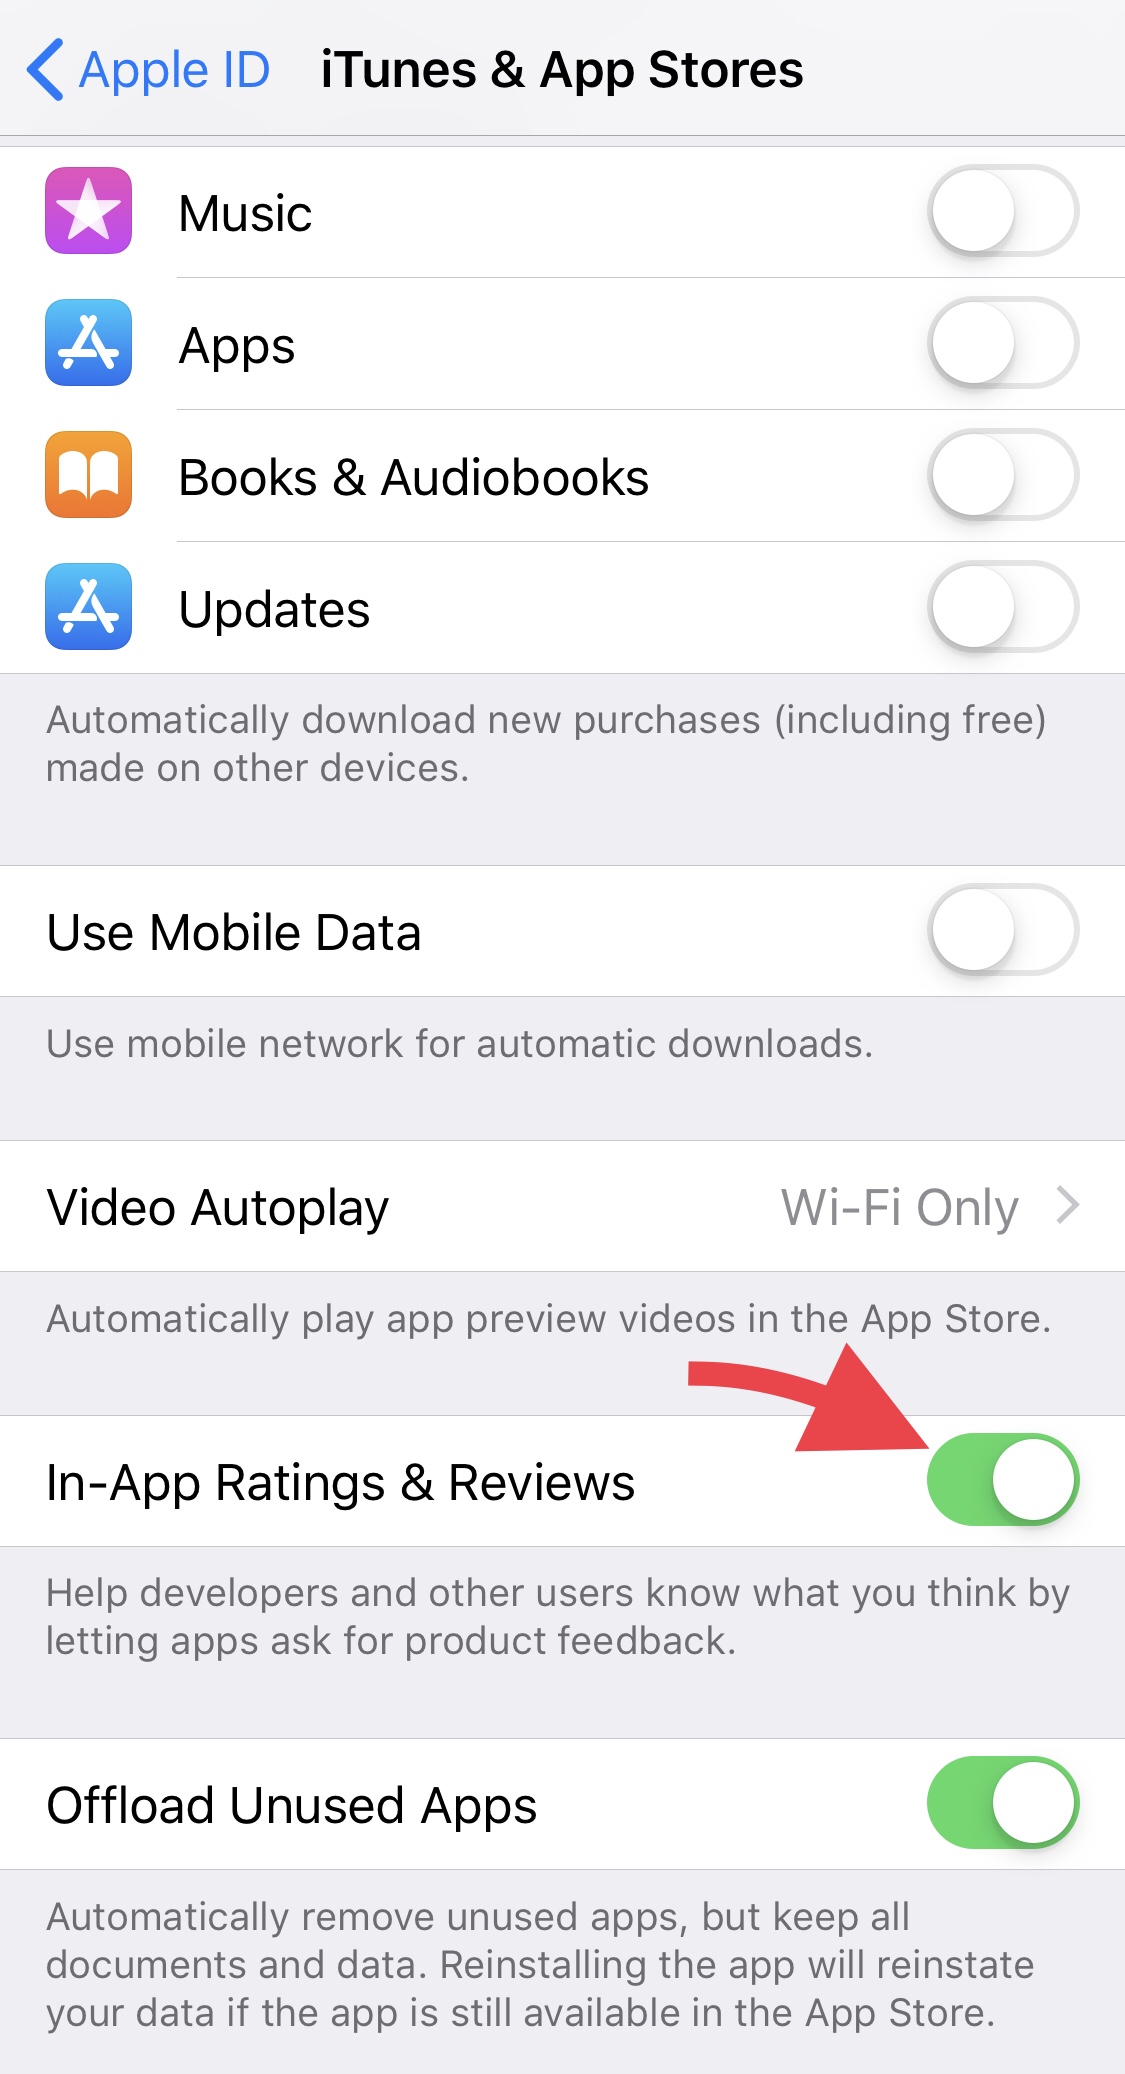
Here’s where to go to disable those feedback requests!
Settings > iTunes & App Store and then tap the switch to toggle off In-App Ratings & Reviews.

Free Café Tech Sessions at Mint Tea & Rosewater Café
Ever wanted to learn more about using your Apple iPhone or iPad?
Come along to a free 1 hour session with an Apple expert, in a relaxed group environment at a great café!

Free café tech sessions for apple iphone/ipad in May 2018

Reece from Setup Sync & Learn is hosting a series of free tech sessions at one of our favourite cafés - Mint Tea & Rosewater Café ☕️
Want to know how to get more out of your Apple iPhone or iPad? Grab a coffee/tea/snack 😋 (this is NOT the free part) and learn handy new tips and tricks from your local Setup Sync & Learn Apple expert (this is free 🤓) at this great café.
WHAT Free Tech Session for Apple iPhones/iPads
WHEN 11am-12pm Mondays May 14, 21, 28 - 2018
WHERE Mint Tea & Rosewater Café - 43 Tramore Place, Killarney Heights NSW
Places are limited, and RSVP is required, so please use our easy Request Form on our website now! Click here
If you've never experienced Mint Tea & Rosewater Café before, take a look here
Free up space on your iPhone

Don't you just hate it when you're taking a photo or mid-recording a video on your iPhone and you get the little pop-up that tells you you've run out of storage? Well, here's a few space-saving tips for you...
Update your iOS
- Since the iOS 10 update in March 2017 Apple introduced a new file structuring system. This new update assisted in freeing up a decent amount of space on iPhones.
- If you haven't updated yet, open Settings > General > Software Update and then follow the prompts.
- Don't forget to make sure your device is backed up!
Delete Apps you don't need
- Let's be honest, we can be a little bit app happy and hoard apps that we no longer use, so it's time to let go of them and you'll be surprised how much space you might actually free up from deleting them.
- To delete an app, tap and hold on the icon until all the icons start jiggling (edit mode), then tap on the 'X' on the left hand corner of the app icon to delete it.
Remove the Pre-installed Apps you don't use
- If you've got the latest iOS 10 then you'll see that you're able to actually delete some of the apps that come preinstalled on your device - ie. Stocks, FaceTime, Mail.
- For more info on this checkout this article by MacWorld.
Find out what Apps are taking up space
- Something really useful is to delete the apps that are taking up most of your space.
- To do this go to Settings > General > Storage & iCloud Usage > Manage Storage and you will see all your apps and how much storage they are taking up.
Clear up your messages!
- You'd be quite surprised how much storage Messages can take up, especially the really old messages you've received with attached photos or videos.
- If you're not too attached to your Messages and can't be bothered going through each chat to delete messages one-by-one here's how you can completely purge your Messages - Settings > Messages > Message History > Keep Messages then select a time option, then tap on Delete.
There are many other ways you can free up space on your device, but hopefully these tips will help you out!
Photo by Jeff Sheldon on Unsplash
Don't Let Your iPhone or iPad Ruin Your Sleep

It has become a natural habit for many of us to look at our iPhone or iPads while lying down in bed. I'm sure you've heard it before, but such a habit can really disrupt our sleep pattern because of the light that our devices emit. So, you might find yourself taking a little bit longer to fall asleep and also to stay asleep.
To combat this issue Apple actually provides an option called 'Night Shift.' It was introduced when iOS 9.3 was released, but not many actually know about it!
What Does Night Shift Do? Night Shift allows you to automatically or manually adjust the colour of your screen from the cool blue that it normally emits to a warmer yellow tone. This warmer tone actually helps you sleep better!
Here's how you can automatically switch Night Shift on from your Lock Screen using the Control Centre...


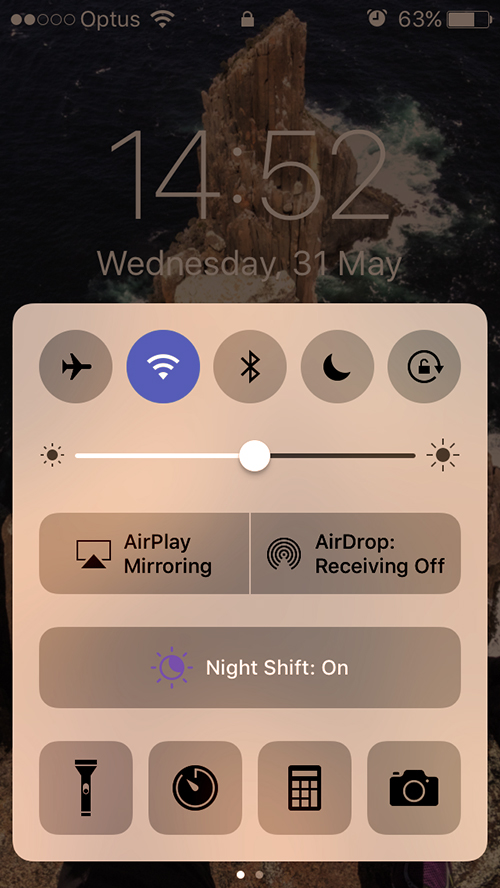
- Swipe up from the edge of your screen while on your Lock Screen to bring up the Control Centre.
- Tap the Night Shift button in the centre and you will see the temperature of your screen change when it is on.
You can also manually enable, set a custom schedule and adjust the colour settings of Night Shift via Settings > Display & Brightness > Night Shift.
Did you know that Night Shift is also available on Mac? Learn how to set it up here!
Take Better Photos With Your iPhone 7!
Look what Apple has given to its iPhone 7 users! Recently Apple released a playlist of video tips on how to take better photos with your iPhone. Starting from the basics, the videos guide you from learning how to take a great selfie to taking an awesome action shot!
When the iPhone 7 was released it was rated one of the top smartphone cameras, even by professional photographers. Having a wider colour range, an improved lens (with a physical zoom!) and sensor for low light situations, photos from the iPhone 7 are sure to turn out great, and greater when you know how to take them! Also for the more tech savy, the RAW option makes it much more flexible for you to capture higher-resolution photos and edit them.

So check out the iPhone 7 Photography video playlist by Apple here and take better pictures with your iPhone!
What Is Ransomware & How To Protect Yourself From It
As previously mentioned in our article on “2 Easy Steps To Keep Your Device Up To Date With Security” there’s a lot of bad stuff happening in the cyber-world with a current Ransomware called WannaCry. But what exactly is Ransomware? Here’s what ransomware is and how you can deal with it and avoid it…
What Is Ransomware? In a nutshell Ransomware comes in two forms. The first is where all your data becomes ENCRYPTED and then a pop-up will occur asking for payment to decrypt your data. This is one of the most popular forms of Ransomware, but rarely has it affected Apple. The second form is when you are LOCKED out of your device and a pop-up notification can appear asking again for payment to have your device unlocked. This form of ransomware has personally happened to me, but lucky enough I was able to recognise it and deal with it.
How Do I Deal With Ransomware? When hit with a Ransomware attack there’s no blaming a person for panicking. It can be quite overwhelming and also invasive. There are quite a few simple steps though into dealing with it.
- Always have a back up - I cannot stress enough how important it is to always back up your iPhone, iPad or Macbook! It’s as simple as backing up your iPhone/iPad to iCloud or to your computer via iTunes. For you MacBook users you can easily go out and buy an external hard drive and set it up with Time Machine.
- Change your passwords - Log in to your AppleID account and change your password. Majority of the time this is the case in Ransomware attacks where your account has been compromised.
When my iPhone was affected by Ransomware the first thing I did was log on to my AppleID account, reset my password and then restored my phone from a previous backup.
How Do I Avoid Ransomware? As my father taught me, it’s always better to prevent than to find a cure. Here are a few simple things you can do to avoid getting caught up in a
- Keep your devices updated - Apple has always been on the ball with keeping its security up to date so it always good to make sure your iOS and OS X are always updated.
- Read before you click! - Sometimes the easiest way to be affected is via email by clicking on random links, or by clicking on random pop-ups in your browser. If you do get a window pop-up that you don’t recognise simply shut it down. Not by clicking on the red ‘X’ in the top left hand corner though, but by pressing COMMAND + ‘W’ because sometimes the window itself can have an ‘invisible link’ or a fake ‘x.’ These cyber buggers are tricky like that!
- Try to avoid unprotected websites - The most simple way to tell if a website has good security is to look at the web address at the top of your Safari browser. If there is a padlock icon next to it then the site is protected.
Apple has just released the latest update for your iPhones/iPads with iOS 10.3.2, so please back up and update your devices ASAP! If you do find yourself in a pickle with Ransomware though and are feeling overwhelmed with how to deal with it, you can always give us a call or an email to book a meeting for us to help you out.
iOS Video Tip: How to Backspace in Calculator
Ever get frustrated with having to keep erasing your calculation and starting all over again when you input the wrong number? Actually there's a way to 'backspace' in Calculator that Apple's been keeping a "secret" for a while. Watch the video below to find out how!

Free Café Tech Sessions at JJ Kings Café (Floreat WA)
Grab a coffee and learn new tips and tricks from an Apple expert at JJ King's Café in Floreat WA.

Free café tech sessions for iphone/ipad in may 2017
Perth people! Michelle from Setup Sync & Learn is hosting a series of free tech sessions at one of our favourite local cafés - JJ Kings.
Want to know how to get more out of your Apple iPhone or iPad? Grab a coffee/tea/snack (this is NOT the free part) and learn handy new tips and tricks from your local Setup Sync & Learn Apple expert (this is free) at this great café.
WHAT Free Tech Session for Apple iPhones/iPads
WHEN Thursdays 10.30am-11.30am May 4, 11, 18, 25
WHERE JJ Kings - 117 Birkdale st, Floreat WA
Places are limited, so please use our RSVP Request Form on our website now! Click here
If you've never experienced JJ Kings before, take a look here
This Week's Video Tip: How To Manually Back Up Your iDevices
Apple's iOS 10.3 update is coming soon and it looks like it's going to be packed with quite a few new things. This is a great time to make sure that you have your iPhone or iPad manually backed up to your computer using iTunes. Though you may have your iPhone or iPad backed up to iCloud it is still good practice to do a manual back up as this backs EVERYTHING up! So just in case anything might go wrong during the update to the new iOS watch this week's video tip to find out how to manually back up all your contacts, settings and data from your iPhone/iPad...