SSL Blog
Please note: BLOG articles below were relevant and correct at time of posting, but due to technology changing so quickly these features and instructions may no longer be relevant in current operating systems and app versions. Please contact us if you have any questions here
NEW: iPhone 12
Apple has announced its next iPhone lineup - the iPhone 12, Mini, Pro and Pro Max. Curious about its look and features? Check out this video by Apple, introducing the iPhone 12…
Apple has announced its next iPhone lineup - the iPhone 12, Mini, Pro and Pro Max. Curious about its look and features? Check out this video by Apple, introducing the iPhone 12…
What's new in iOS 14?
Apple iOS 14.0.1
iOS 14 has just been released and it comes with a plethora of new features!
Widgets
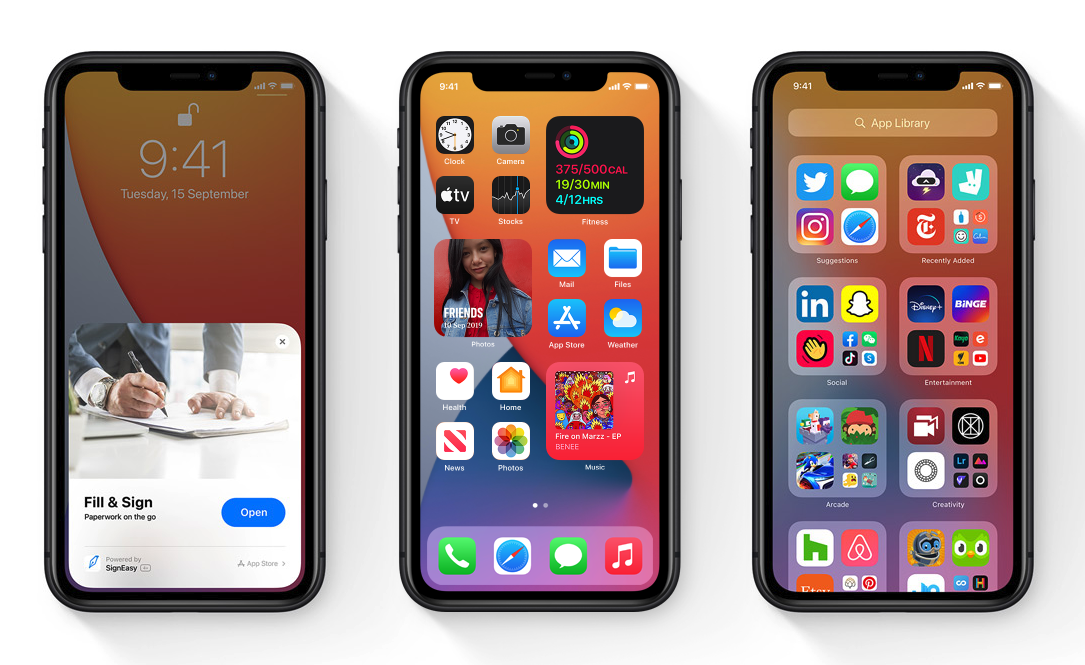
It’s all about the Widgets this update. You can expect the following…
Redesigned widgets
Widgets for everything
Widgets on the Home Screen
Widgets in different sizes
Widget Gallery
Widget stack
Smart stack
Siri Suggestions widget
Developer API
App Library
So much customisability, developers are going wild! There is also now the added App Library which is a new space located on the Home Screen. It automatically categorises your Apps into categories such as Social, Productivity and Entertainment. Not only does it organise your Apps by category, but it also organises them based on your usage on them. How smart!
App Library on the Home Screen
Automatic categorisation
Suggestions
Search
Hid Home Screen pages
Recently Added
Compact UI
The minimalist movement is truly making its move and so you’ll see that the user-interface has changed quite a bit in iOS 14. Everything is a little more stream-lined. Rather than taking up your whole screen when receiving a call, it pops up just as a banner so you can continue viewing what was on your screen while taking the call.
Compact Phone Calls
Compact UI available for Third-Party VoIP Calls (ie. Skype)
Compact FaceTime calls
Compact Siri
Picture-in-Picture
Resize Picture-in-Picture window
Move Picture-in-Picture window to any corner
Minimise Picture-in-Picture window off-screen
These are just a few of the new features and updates in Apple’s new iOS 14. There’s even a built in Translation app now too! Check out these best iOS features by 9to5 Mac to find out more.
HOW TO: Protect you private Notes with a password
Got a secret you need to keep in your Notes on your iPad, iPhone or Mac? Or maybe just a place to store your not so super-secretive passwords and login details? There’s no need to download any fancy vault-keeping type app if you’re looking to keep a few simple notes private since in Apple’s Notes app you can assign a password to any individual note! There’s two ways to achieve this, so here’s how…
1. Locking notes on your iPhone/iPad:
Navigate to your Settings
Select Notes
Tap on Password (select the account you want to have a password on if you have multiple accounts)
Enter a password and be sure to give yourself a hint just in case you forget (you can also use Face/TouchID if you have a compatible device)
Tap on Done
2. Locking notes in the App
Navigate to Notes
Select the Action/Share icon
Select Lock Note
Enter a password and be sure to give yourself a hint just in case you forget (you can also use Face/TouchID if you have a compatible device)
Select Done
To learn a little more about it you can visit Apple’s Support page here.
Everything new that's coming to Apple
So Apple just held their annual World Wide Developer Conference and made it available online via streaming. If you, like me, couldn’t be bothered staying awake to watch it (I am not that crazed an Apple follower, good sleep comes first!), here’s a comprehensive list of new things coming to Apple that was announced!
Apple will start running their Macs on Apple-made chips instead of Intel
iOS 14 is coming and it will give you more options to customise your phone
Apple is re-inventing the car key fob
iPadOS 14 is making your iPad more like a computer
MacOS along with Safari is going to get significant upgrade as Big Sur comes into development
Seamless device switching when it comes to using your AirPods
Sleep and handwashing features for WatchOS 7
PHOTOGRAPH: BROOKS KRAFT/APPLE
You can read more about these announcements thanks to the good folk at Wired - “Here’s everything Apple announced at WWDC.”
iOS TIP: Turn off Location Sharing
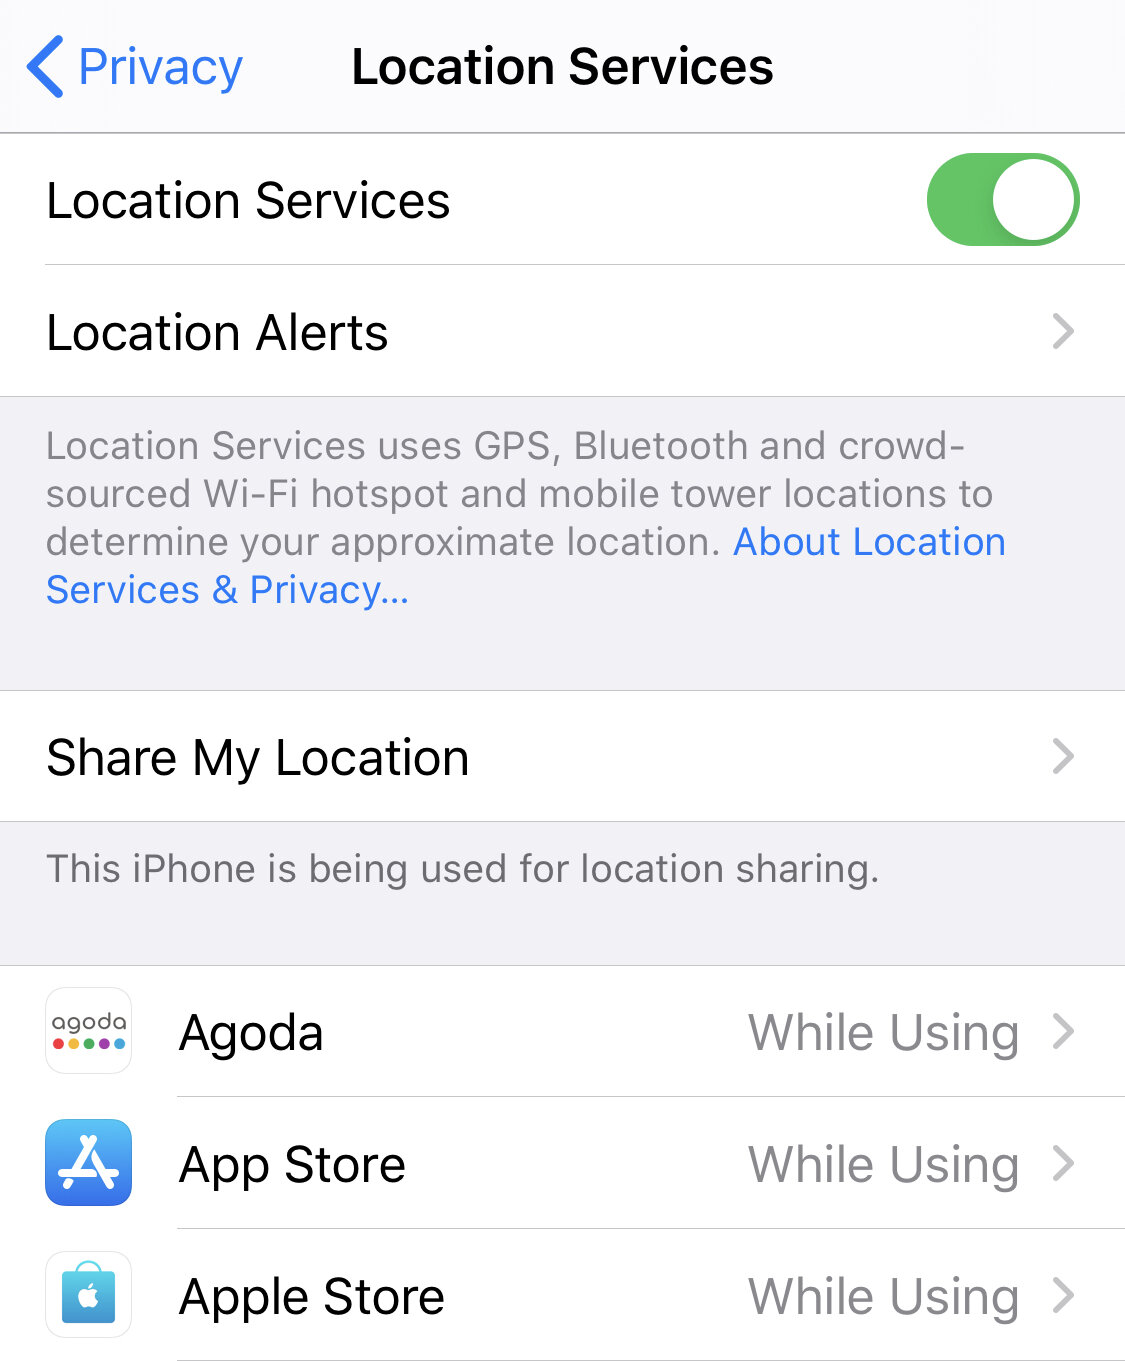
The team at Setup, Sync and Learn hope that you all are fairing well and are safe at the current time. Right now, we are so happy about the lightening of restrictions as Australia has successfully been flattening the curve. You may have heard that the government recently launched a new app called COVIDSafe. Prior to its release, it brought up many conversations about privacy. The thought of being “tracked” worried many people, but hopefully, the most recent news on the app has helped clear any misunderstandings, as the app doesn’t track your location. But, did you know there could be other apps on your phone that are tracking your location? Here’s where you can find out which apps have location sharing on, and how you can change their permissions…
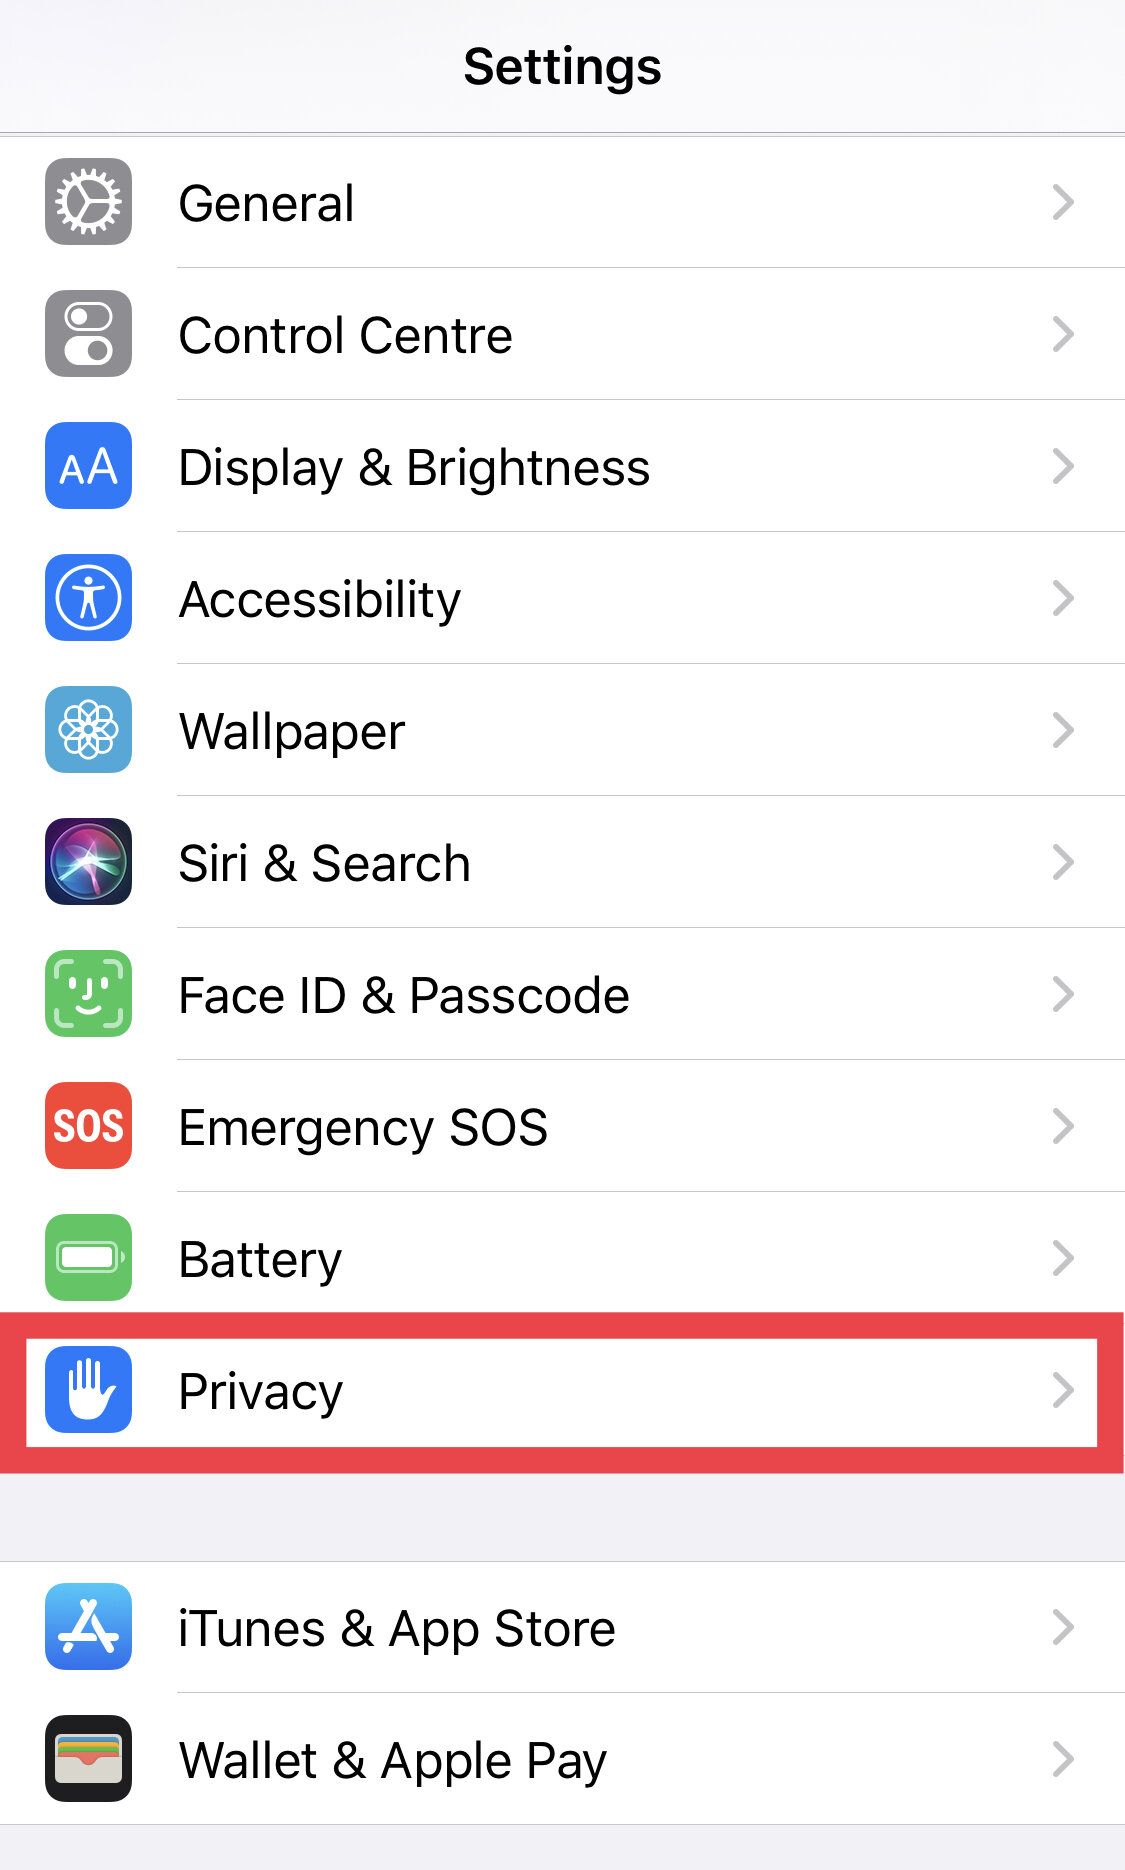
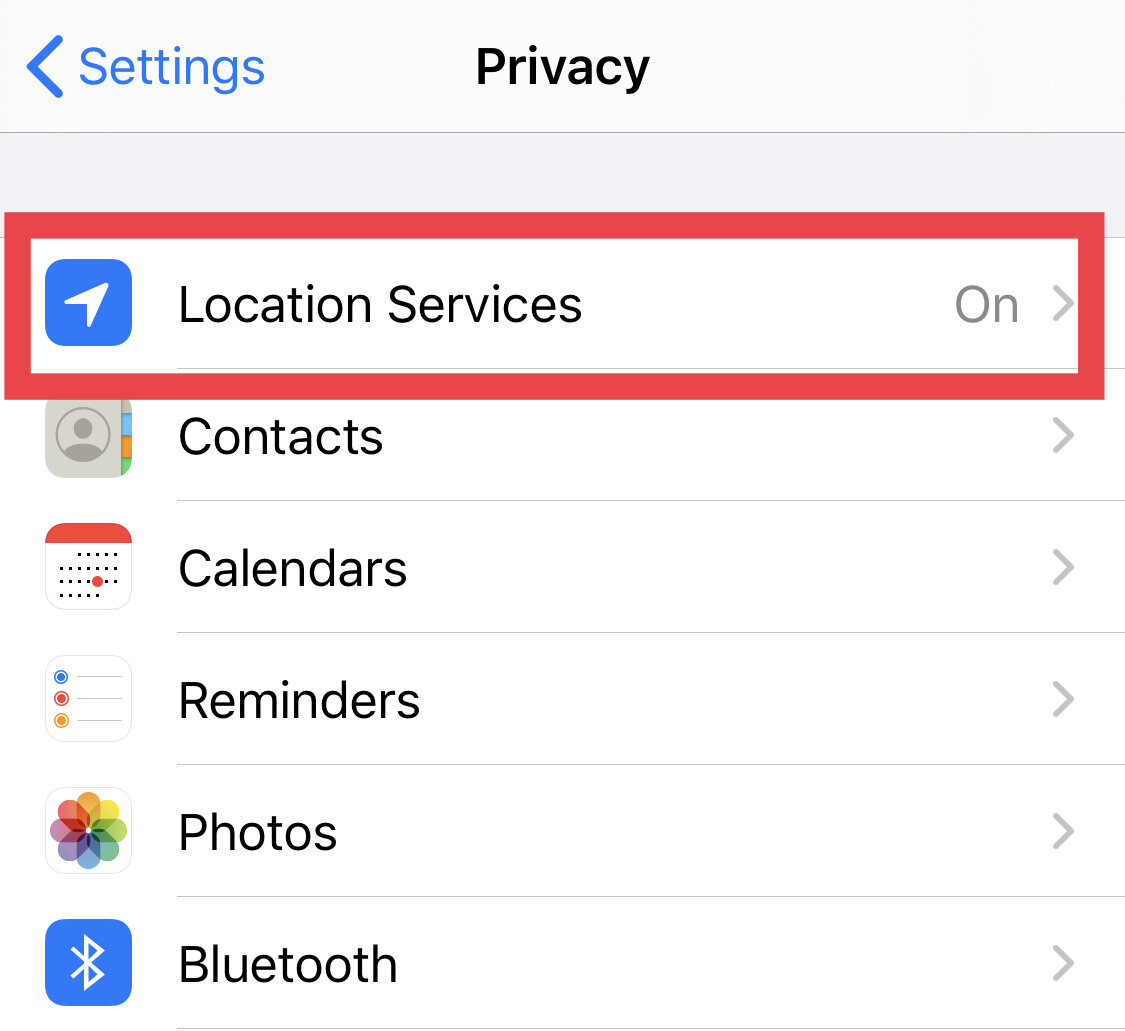
Settings > Privacy > Location Services
HOW TO: Look good in a video call
Many of you may be finding yourselves working from home, posting all those selfies on social media with the hashtag #WFH (Working From Home). With social distancing having being implemented we find ourselves turning to virtual meetings via video calls. Despite not being able to be with one another physically, we do still want to look somewhat presentable! So here’s a fun article from Cult of Mac on 5 ways to look great on a video call. They bring up 5 tips to think about it…
Lighting
Camera Angle
Your background
Make-up?
How to dress
Check out their article here.
HOW TO: Video-call using Group FaceTime
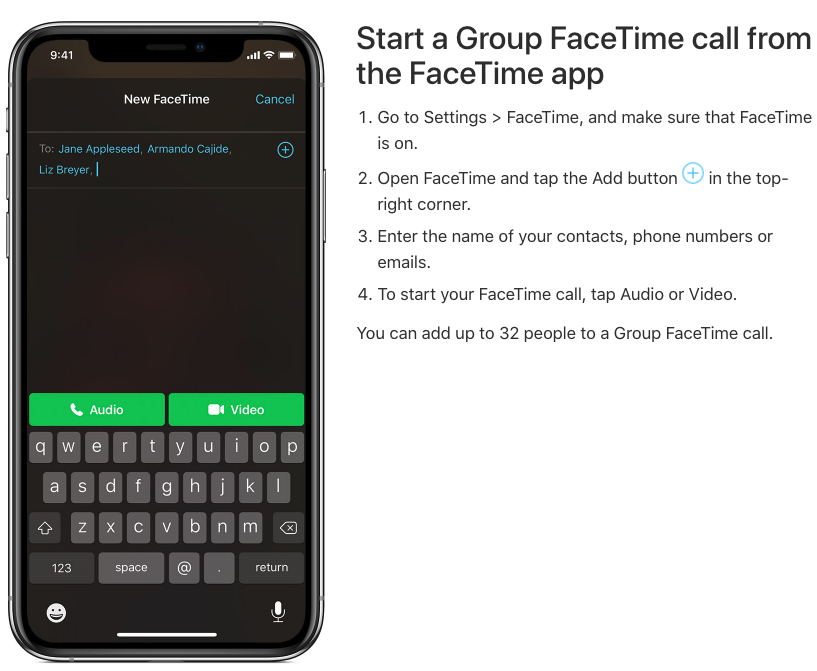
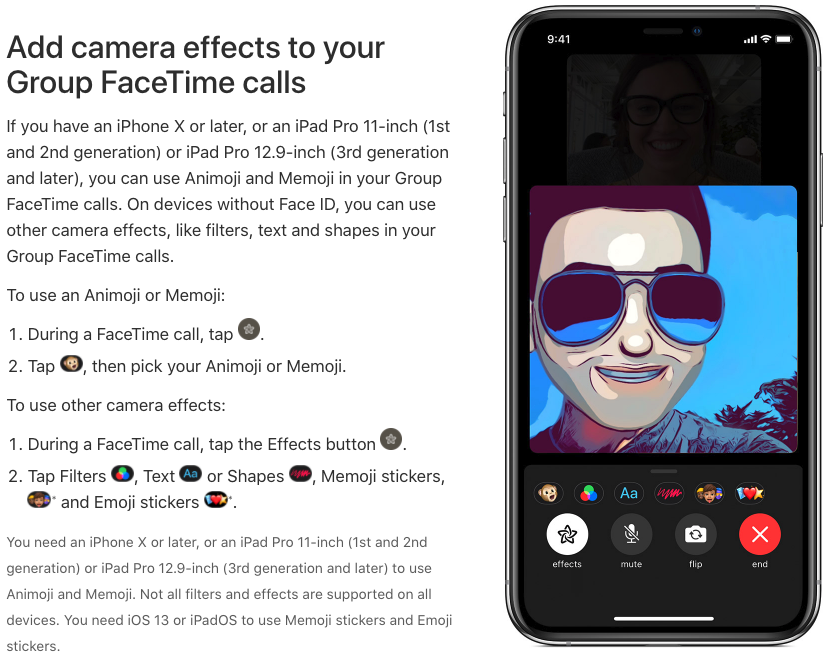
With the whole community in isolation it’s no wonder many people are turning to video-calling apps to keep in touch with one another. We know that Apple has FaceTime where we can do video and audio calls to our loved ones, but did you know you can also do GROUP FaceTime video/audio calls? Here’s a helpful guide from Apple Support on how to use Group FaceTime on your iPhone, iPad or iPod. If you own a Mac, they also have a learning guide here too. So get together with the family with a virtual gathering via. FaceTime. There’s also many fun things you can do with the Camera Effects.
iOS Tip: Answer a message with a touch and tap!
Did you know that you can answer a text without having to type a whole reply out? Well, it depends what the text is, but iOS has the smarts to give you options for an appropriate answer. Here’s how!
In your Messages, tap and hold down on the conversation you’d like to reply. You’ll then see a pop-up with suggestions on what to apply. Tap on the reply you want to use. Voila! Done ☺️
We hope you liked that useful tip from Apple’s Genius Picks. You can like and follow our Facebook page for more handy tips!
Apple Tip: How to restore your contacts
Whether it’s absent mindedness or a slip of the finger, you may find yourself accidentally deleting a contact or two. No need to fear though if you’ve got backup enabled on your iCloud. Here’s how you can recover your contacts…
Log into your iCloud account using your Apple ID
Scroll down to where it says Advanced and click on Restore Contacts
Then select an archive of your contacts that was from a date before you had accidentally removed/lost the contacts
iOS TIP: Swipe to Type
We’re always looking for a little more efficiency in life and sometimes we don’t notice the subtle changes Apple makes to help us along the way. If you’ve kept your iPhone updated you may have noticed a little something-something has been added to your keyboard. It’s been a long time coming, yes, I complained a little that Apple’s iOS was sooooo behind on this feature that has been around on other phone operating systems for a while, but alas the patience has paid off. So while you’re holding that reusable coffee cup in your left hand you can now swipe-to-type on your iPhone in the other hand, or the other way around, coffee in the right and phone in the left. How you ask? Well, if you’ve updated to the latest iOS 13 there’s no need to enable anything as the update would have automatically enabled it by default.
Image by Jéshoots from www.pexels.com
HOW TO DO IT?
To begin swiping-to-type, just place your finger (or thumb) on your keyboard screen and swipe it across the letters of the word you want to type. For example, for the word “Okay,” all you have to do is drag your finger/thumb over the respective letters in order “O-K-A-Y” and the keyboard will predict the word you’re trying to input.
We hope you enjoy this nifty iOS 13 feature as much as us!
iOS TIP: How to clean your iPhone and iPad properly
With the recent news about COVID-19 it sure is a good decision to take some precaution with the surfaces we come in contact with. Did you know that your iPhone or iPad may be dirtier than you think? Well, no need to freak out! The good folk at www.prevention.com has given you a simple and correct guide on how to clean your iPhone or iPad according to a Germ Pro. Make sure to read it through carefully as there are some things that can damage your device, as Apple have also mentioned themselves, where it can damage the finger-print resistant coating.
Prevention’s article gives you 5 easy steps to follow…
Power down
Opt for microfiber cloths
Turn to rubbing alcohol
Don’t use abrasive products
Keep it clean
Learn more about the details by reading the article here, “How to Clean Your Cell Phone the Right Way, According to a Germ Expert” - By Elizabeth Millard.
Image by Burst from Pexels.
iOS TIP: Share using AirDrop
Recently I’ve found myself doing quite a bit of sharing photos and Safari links from my iPhone to another iPhone or to a Mac. If you’re still trying to share files by iMessage or Mail to other Apple users you may not be aware of Apple’s sharing feature, AirDrop! So here’s how to use AirDrop thanks to Apple’s Genius Picks.
All you have to do is tap on the Share Icon (a square icon with an arrow pointing up out of it) and then tap on AirDrop. Select the name of the person’s device and the transfer will begin.
iOS TIP: How to change the language of an app
If you’re like me and find learning a new language is easier when you integrate it into everyday things (ie. purposefully changing the language of my phone) then this little genius tip might be great for you! Instead of changing the whole language on your iPhone, you can change the language only for a particular app.
HERE’S HOW!
Go to Settings > Tap on an App > Tap on Language > VOILA!
Please Note: Not all apps may have this function.
iOS TIP: Sorry running late! How to share your ETA
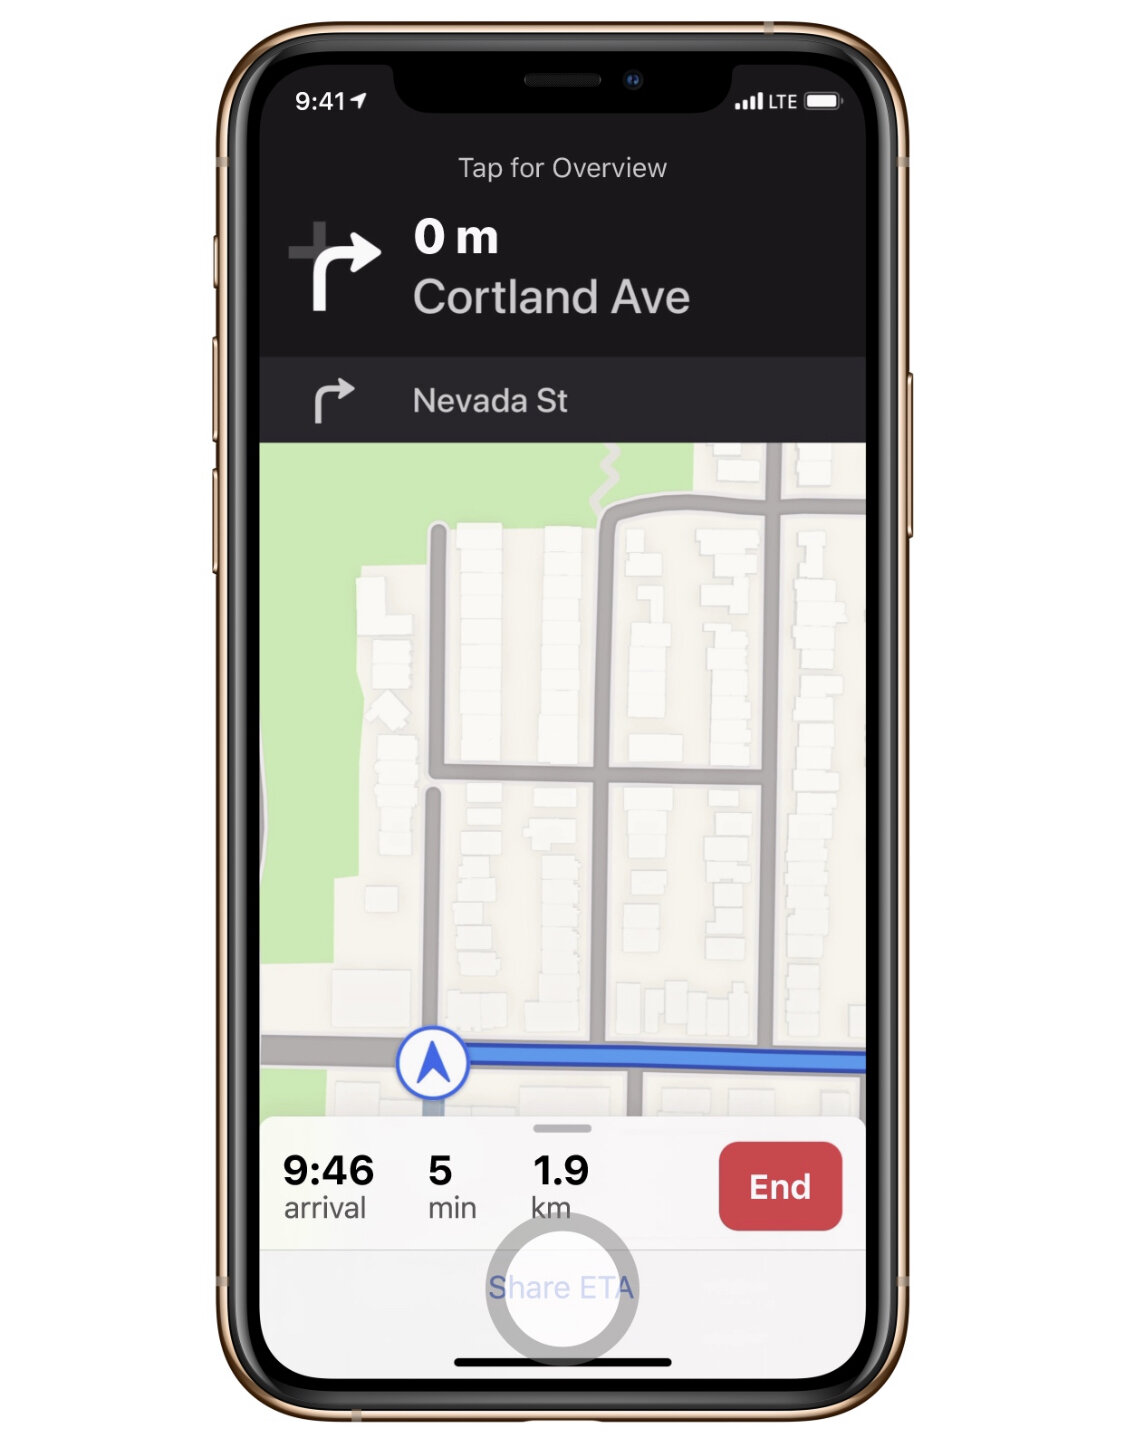
Here’s a quick iOS TIP for you in case you’re running a little late and you have friends who want to know how far away you are.
Open APPLE MAPS > Input your destination > Directions > GO > Tap on the bottom anchor which shows the ARRIVAL/MIN/KM > Tap on Share ETA > Select the contact you want to share it to.
iOS Tip: How to stop your kids from trying to hack Screen Time
Let’s be honest here, as much as we want to have some semblance of parental control over what kids do on their iPhones, iPads or iPods they somehow have the knack of finding loopholes. Well, it’s time to fight back! Kidding…somewhat. But here are 3 loopholes that some smart alec kids have been able to find to bypass Apple’s Screen Time parental control feature and also their SOLUTIONS!
Photo by David Grandmougin on Unsplash
BYPASSING SCREEN TIME BY CHANGING THE TIMEZONE…
High-five the child for such a genius hack then take their phone off them
Disable Screen Time on their phone
Go to Settings > General > Date & Time > Enable “Set Automatically”
Enable Screen Time again and make sure you set the 4-digit Pass Code (remember it and hide it from the kids!)
Turn on “Content & Privacy Restrictions”
Go down and tap on “Location Services”
At the bottom you’ll see “System Services”
Enable “Setting Time Zone” and then go back
At the top of the “Location Services” screen, toggle on “Don’t Allow Changes” - This should grey out the options in System Services and “Setting Time Zone”
Now in Settings > General > Date & Time everything should be greyed out and the kid won’t be able to change anything!
MY KID CAN STILL USE THE APP EVEN THOUGH I’VE SET APP LIMITS!
This one is simple. One little switch makes the difference!
On their phone go to Settings > Screen Time > App Limits > Add Limit
Select a Category or individual App
Set the time limit and now make sure you enable “Block at End of Limit”
Done!
THEY’RE WATCHING YOUTUBE VIDEOS THROUGH THE iMESSAGE WIDGET!
What a little genius, but such genius must be squashed…
Settings > Screen Time > Content & Privacy Restrictions > Content Restriction > Enter Passcode > Web Content
Tick “Limit Adult Websites”
Under “NEVER ALLOW” add this web address - https://www.youtube.com - NO MISTAKES! COPY IT EXACTLY OR IT WON’T WORK!
You may also want to remove the iMessage app from the “Always Allowed” list…
Settings > Screen Time > Always Allowed > Remove it from the Allowed Apps by tapping on the red circle with the minus sign in the middle
iOS Quick Tip: Undo/Redo
Here’s a quick tip from Apple if you’ve made a mistake in Notes or in iMessages, etc. With three fingers, swipe left to UNDO. Swipe right if your want to REDO.
iOS Quick Tip: Scroll Bar
If you’ve updated to the new iOS you might’ve noticed a new scroll bar while navigating through a page in Safari. Not only is it useful for seeing where you are on a page you can now use it to scroll faster! Have a crack at it by normally scrolling through a page, then tap and hold the scroll bar on the right and drag it up or down to scroll through the page. Also the faster you move the scroll bar the faster you will scroll through the page!
Your iPhone can help you in an emergency!
It’s hard to dial an emergency number in an emergency! But there is actually a quick way to make an SOS call on your iPhone. Here’s how you do it…
Access SOS on your iPhone by pressing and holding down the side button and either volume button. Your iPhone will then contact emergency services and also send a message to your emergency contacts in your Medical ID and Health app.
iOS Quick Tip: It's all about that Battery Health
Once again, Apple is working on our iPhone battery woes! Now that iOS 13 is a little more ironed out with a few multiple updates to fix a few bugs, let’s talk about the changes they’ve made to help us with Battery Life.
We all get a little confused when it comes to charging our phone overnight, but look, you’re not going to overload your phone while your sleep and charge. So Apple has done this thing with your trickle-charging. Usually once our batteries charge to 100% it switches to trickle charging. What is trickle charging, you ask? Well, let’s ask Siri…
Using it’s AI magic your iPhone will learn your routine. Yes, your iPhone is stalking you, but it’s for the good of your battery! It will set up a routine of only charging your iPhone to 80%, switch to trickle charging, and then by learning your wake up time, it will charge up to 100% just as you wake and hit snooze.
Here’s how to activate it…
Settings > Battery > Battery Health > Turn ON Optimised Battery Charging.
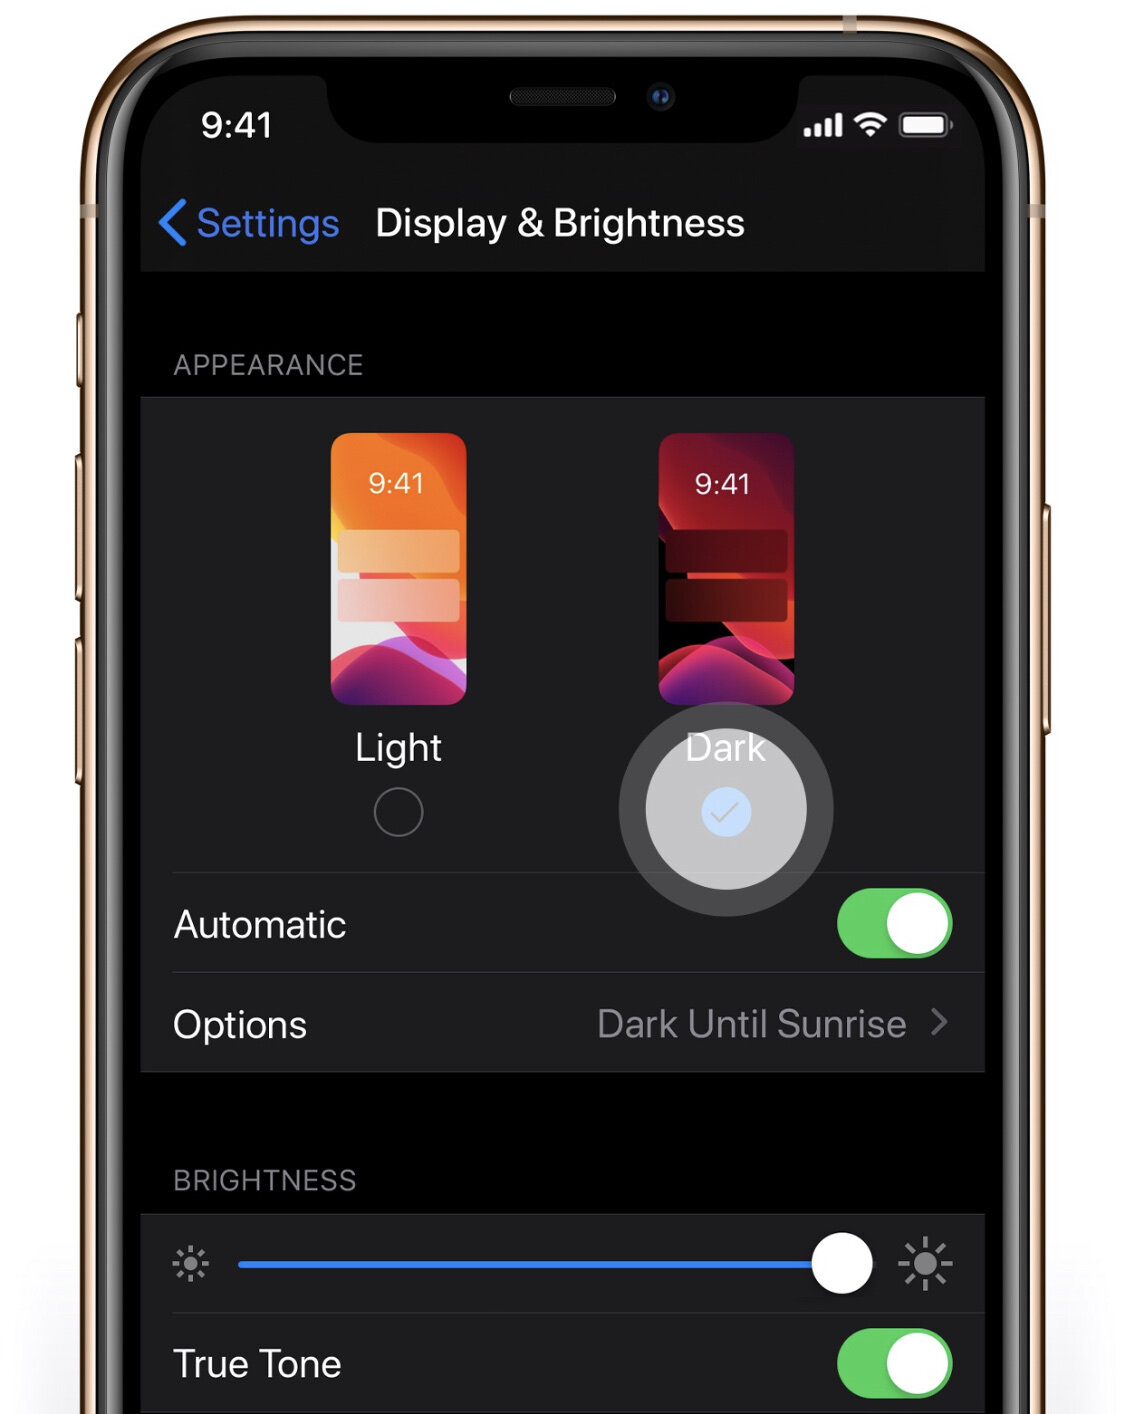
iOS Quick Tip: Going Dark
iOS 13 is here and so is Dark Mode! You can switch from Light to Dark Mode straight away, automatically or schedule it. To set this go to Settings > Display and Brightness.

