HOW TO: Protect you private Notes with a password

Got a secret you need to keep in your Notes on your iPad, iPhone or Mac? Or maybe just a place to store your not so super-secretive passwords and login details? There’s no need to download any fancy vault-keeping type app if you’re looking to keep a few simple notes private since in Apple’s Notes app you can assign a password to any individual note! There’s two ways to achieve this, so here’s how…

1. Locking notes on your iPhone/iPad:

  1. Navigate to your Settings

  2. Select Notes

  3. Tap on Password (select the account you want to have a password on if you have multiple accounts)

  4. Enter a password and be sure to give yourself a hint just in case you forget (you can also use Face/TouchID if you have a compatible device)

  5. Tap on Done

2. Locking notes in the App

  1. Navigate to Notes

  2. Select the Action/Share icon

  3. Select Lock Note

  4. Enter a password and be sure to give yourself a hint just in case you forget (you can also use Face/TouchID if you have a compatible device)

  5. Select Done

To learn a little more about it you can visit Apple’s Support page here.

Optimise your home internet set up

It’s not always our Internet Service Provider’s fault when it comes to slow internet at home. Sometimes it makes a big difference by making a little change, such as where you put your WiFi router in the house. Check out these tips from NBN Co. that may help you improve your internet at home.

  1. Upgrade your modem

  2. Check for objects that can interfere with your Wi-Fi signal

  3. Connect to the right Wi-Fi band

  4. Move your modem away from brick or complex walls

  5. Assess the number of multiple connected devices

  6. Use an Ethernet cable to connect your high definition television

  7. Check your cabling

  8. Consider upgrading older devices

  9. Ensure your device is compatible

Photo by Stephen Phillips - Hostreviews.co.uk on Unsplash

Photo by Stephen Phillips - Hostreviews.co.uk on Unsplash

To read more of the details of these tips, check out NBN Co’s article here as well as to read up on other things about your home internet.

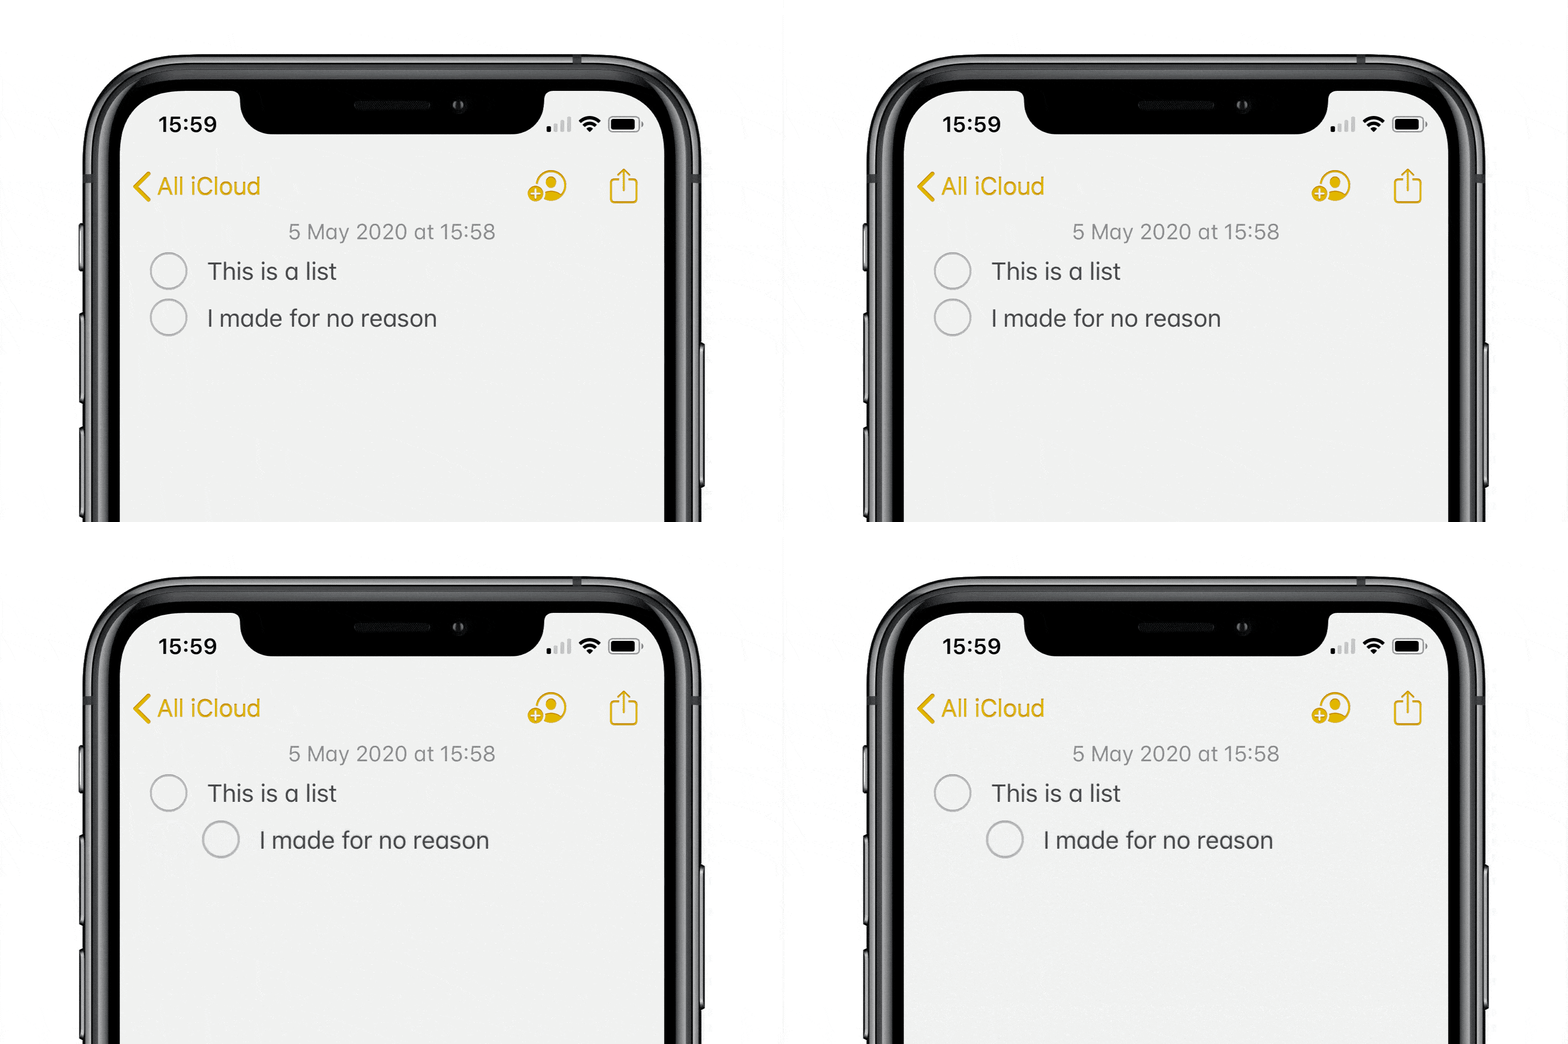
iOS TIP: How to quickly nest your lists in notes

It’s not just ‘swipe right’ for a particular social app, but you can also use this handy shortcut to nest your lists in Notes! I love how quick and simple it is to keep my plans and thoughts organised. Here’s how easy it is to sort your list out with just a swipe…

  1. Make your list in Notes as you would normally do, either using bullets, dashes or numbers, etc.

  2. When you reach the line on the list entry you want to nest just do a quick swipe on the bullet-point, dash or number to the right!

  3. Et voila! You’re now an organised, list-making pro

GIF: Killian Bell/Cult of Mac

GIF: Killian Bell/Cult of Mac

We hope you enjoyed this quick tip! If you want more, just give us a follow on our Facebook page. Got bigger questions or would like to learn more about your Apple device? Give us a shout to see how we can help you!

Apple Tip: How to restore your contacts

Whether it’s absent mindedness or a slip of the finger, you may find yourself accidentally deleting a contact or two. No need to fear though if you’ve got backup enabled on your iCloud. Here’s how you can recover your contacts…

IMG_0724.jpg
  1. Log into your iCloud account using your Apple ID

  2. Scroll down to where it says Advanced and click on Restore Contacts

  3. Then select an archive of your contacts that was from a date before you had accidentally removed/lost the contacts

IMG_0727.jpg
IMG_0728.jpg

iOS TIP: Swipe to Type

We’re always looking for a little more efficiency in life and sometimes we don’t notice the subtle changes Apple makes to help us along the way. If you’ve kept your iPhone updated you may have noticed a little something-something has been added to your keyboard. It’s been a long time coming, yes, I complained a little that Apple’s iOS was sooooo behind on this feature that has been around on other phone operating systems for a while, but alas the patience has paid off. So while you’re holding that reusable coffee cup in your left hand you can now swipe-to-type on your iPhone in the other hand, or the other way around, coffee in the right and phone in the left. How you ask? Well, if you’ve updated to the latest iOS 13 there’s no need to enable anything as the update would have automatically enabled it by default.

Image by Jéshoots from www.pexels.com

HOW TO DO IT?

To begin swiping-to-type, just place your finger (or thumb) on your keyboard screen and swipe it across the letters of the word you want to type. For example, for the word “Okay,” all you have to do is drag your finger/thumb over the respective letters in order “O-K-A-Y” and the keyboard will predict the word you’re trying to input.

We hope you enjoy this nifty iOS 13 feature as much as us!

iOS TIP: How to change the language of an app

If you’re like me and find learning a new language is easier when you integrate it into everyday things (ie. purposefully changing the language of my phone) then this little genius tip might be great for you! Instead of changing the whole language on your iPhone, you can change the language only for a particular app.

HERE’S HOW!

Go to Settings > Tap on an App > Tap on Language > VOILA!

change_iphone_app_language.jpeg

Please Note: Not all apps may have this function.

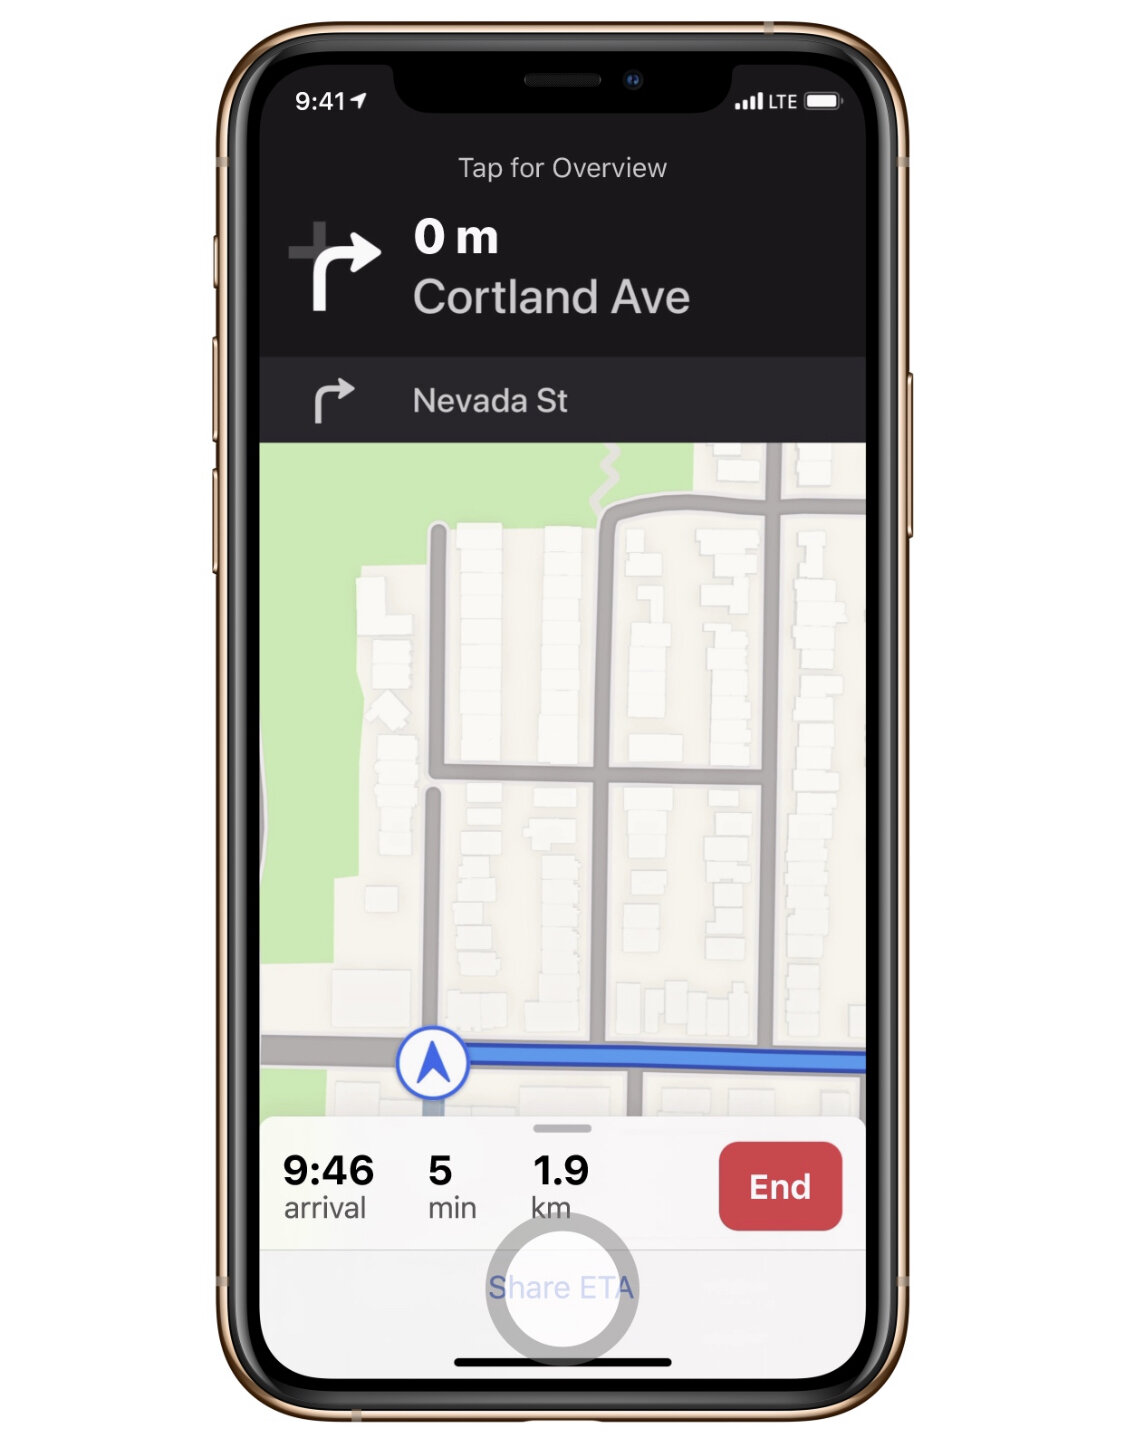
iOS TIP: Sorry running late! How to share your ETA

Here’s a quick iOS TIP for you in case you’re running a little late and you have friends who want to know how far away you are.

Open APPLE MAPS > Input your destination > Directions > GO > Tap on the bottom anchor which shows the ARRIVAL/MIN/KM > Tap on Share ETA > Select the contact you want to share it to.

Share_Arrival_Time_Setup_Sync_Learn.jpeg

iOS Tip: How to stop your kids from trying to hack Screen Time

Let’s be honest here, as much as we want to have some semblance of parental control over what kids do on their iPhones, iPads or iPods they somehow have the knack of finding loopholes. Well, it’s time to fight back! Kidding…somewhat. But here are 3 loopholes that some smart alec kids have been able to find to bypass Apple’s Screen Time parental control feature and also their SOLUTIONS!

BYPASSING SCREEN TIME BY CHANGING THE TIMEZONE…

  1. High-five the child for such a genius hack then take their phone off them

  2. Disable Screen Time on their phone

  3. Go to Settings > General > Date & Time > Enable “Set Automatically”

  4. Enable Screen Time again and make sure you set the 4-digit Pass Code (remember it and hide it from the kids!)

  5. Turn on “Content & Privacy Restrictions”

  6. Go down and tap on “Location Services”

  7. At the bottom you’ll see “System Services”

  8. Enable “Setting Time Zone” and then go back

  9. At the top of the “Location Services” screen, toggle on “Don’t Allow Changes” - This should grey out the options in System Services and “Setting Time Zone”

  10. Now in Settings > General > Date & Time everything should be greyed out and the kid won’t be able to change anything!

MY KID CAN STILL USE THE APP EVEN THOUGH I’VE SET APP LIMITS!

This one is simple. One little switch makes the difference!

  1. On their phone go to Settings > Screen Time > App Limits > Add Limit

  2. Select a Category or individual App

  3. Set the time limit and now make sure you enable “Block at End of Limit”

  4. Done!

THEY’RE WATCHING YOUTUBE VIDEOS THROUGH THE iMESSAGE WIDGET!

What a little genius, but such genius must be squashed…

  1. Settings > Screen Time > Content & Privacy Restrictions > Content Restriction > Enter Passcode > Web Content

  2. Tick “Limit Adult Websites”

  3. Under “NEVER ALLOW” add this web address - https://www.youtube.com - NO MISTAKES! COPY IT EXACTLY OR IT WON’T WORK!

  4. You may also want to remove the iMessage app from the “Always Allowed” list…

  5. Settings > Screen Time > Always Allowed > Remove it from the Allowed Apps by tapping on the red circle with the minus sign in the middle

iOS Quick Tip: Saving Email Drafts

Here’s a quick tip for you and your iPhone or iPad when sending emails from the geniuses at Apple. Need to quickly save an email draft? While writing an email, simply swipe down on the little anchor point at the top of that message. To retrieve it again just tap on the draft at the bottom.

Adjustments.jpeg

iOS Quick Tip: Scroll Bar

If you’ve updated to the new iOS you might’ve noticed a new scroll bar while navigating through a page in Safari. Not only is it useful for seeing where you are on a page you can now use it to scroll faster! Have a crack at it by normally scrolling through a page, then tap and hold the scroll bar on the right and drag it up or down to scroll through the page. Also the faster you move the scroll bar the faster you will scroll through the page!

Adjustments.jpeg

iOS Quick Tip: It's all about that Battery Health

Once again, Apple is working on our iPhone battery woes! Now that iOS 13 is a little more ironed out with a few multiple updates to fix a few bugs, let’s talk about the changes they’ve made to help us with Battery Life.

We all get a little confused when it comes to charging our phone overnight, but look, you’re not going to overload your phone while your sleep and charge. So Apple has done this thing with your trickle-charging. Usually once our batteries charge to 100% it switches to trickle charging. What is trickle charging, you ask? Well, let’s ask Siri…

Hey Siri…

What’s trickle charging?

Using it’s AI magic your iPhone will learn your routine. Yes, your iPhone is stalking you, but it’s for the good of your battery! It will set up a routine of only charging your iPhone to 80%, switch to trickle charging, and then by learning your wake up time, it will charge up to 100% just as you wake and hit snooze.

Here’s how to activate it…

Settings > Battery > Battery Health > Turn ON Optimised Battery Charging.

Battery_Health_Screenshot_Setup_Sync_Learn.png

Quick iOS Tip: Access your favourite app with a swipe!

public.jpeg

Here’s a quick tip straight from the essentials of iOS! You can access your favourite App with just a swipe to the right and view its widget in your Today view. To add an App, find its icon, press down on it (with the 3D Touch), then tap on Add Widget.

public.jpeg

Now you’ll be able to quickly view the App from your Lock Screen by swiping right!

Quick iOS Tip: I’m still listening!

Sometimes you’re on a call and then someone else might walk in and want to start discussing something important, but then you may not want whoever is on the phone listening. Or you could be listening to that friend of yours venting, but secretly you’re watching Netflix in the background so you don’t want them to hear that background noise…okay, I’m kidding. We’re not that kind of friend. A friend must always be actively listening! But here’s how you mute yourself in a call. Just tap the mute button!

public.jpeg

Free Café Tech Sessions in Perth

Free Café Tech Sessions in Perth

Free Café Tech Sessions in Perth:

On Wednesdays in November, Michelle will be at JJ Kings great café in Floreat. If you'd like to learn some new tips & tricks on your iPhone/iPad, in a relaxed environment whilst having a coffee, RSVP now for your preferred date as places will be limited.

Read More