

Remote Session time? COVID-19 update for clients
/
If you’re isolating at home, working, studying or running the now very busy household, you may find that you need some technical help or advice.
Read MoreApple and technology news with Setup Sync & Learn in Sydney and Perth.
Please note: BLOG articles below were relevant and correct at time of posting, but due to technology changing so quickly these features and instructions may no longer be relevant in current operating systems and app versions. Please contact us if you have any questions here
If you’re isolating at home, working, studying or running the now very busy household, you may find that you need some technical help or advice.
Read MoreWhether it’s absent mindedness or a slip of the finger, you may find yourself accidentally deleting a contact or two. No need to fear though if you’ve got backup enabled on your iCloud. Here’s how you can recover your contacts…

Log into your iCloud account using your Apple ID
Scroll down to where it says Advanced and click on Restore Contacts
Then select an archive of your contacts that was from a date before you had accidentally removed/lost the contacts


We’re always looking for a little more efficiency in life and sometimes we don’t notice the subtle changes Apple makes to help us along the way. If you’ve kept your iPhone updated you may have noticed a little something-something has been added to your keyboard. It’s been a long time coming, yes, I complained a little that Apple’s iOS was sooooo behind on this feature that has been around on other phone operating systems for a while, but alas the patience has paid off. So while you’re holding that reusable coffee cup in your left hand you can now swipe-to-type on your iPhone in the other hand, or the other way around, coffee in the right and phone in the left. How you ask? Well, if you’ve updated to the latest iOS 13 there’s no need to enable anything as the update would have automatically enabled it by default.

Image by Jéshoots from www.pexels.com
To begin swiping-to-type, just place your finger (or thumb) on your keyboard screen and swipe it across the letters of the word you want to type. For example, for the word “Okay,” all you have to do is drag your finger/thumb over the respective letters in order “O-K-A-Y” and the keyboard will predict the word you’re trying to input.
We hope you enjoy this nifty iOS 13 feature as much as us!
With the recent news about COVID-19 it sure is a good decision to take some precaution with the surfaces we come in contact with. Did you know that your iPhone or iPad may be dirtier than you think? Well, no need to freak out! The good folk at www.prevention.com has given you a simple and correct guide on how to clean your iPhone or iPad according to a Germ Pro. Make sure to read it through carefully as there are some things that can damage your device, as Apple have also mentioned themselves, where it can damage the finger-print resistant coating.
Prevention’s article gives you 5 easy steps to follow…
Power down
Opt for microfiber cloths
Turn to rubbing alcohol
Don’t use abrasive products
Keep it clean
Learn more about the details by reading the article here, “How to Clean Your Cell Phone the Right Way, According to a Germ Expert” - By Elizabeth Millard.

Image by Burst from Pexels.
Recently I’ve found myself doing quite a bit of sharing photos and Safari links from my iPhone to another iPhone or to a Mac. If you’re still trying to share files by iMessage or Mail to other Apple users you may not be aware of Apple’s sharing feature, AirDrop! So here’s how to use AirDrop thanks to Apple’s Genius Picks.
All you have to do is tap on the Share Icon (a square icon with an arrow pointing up out of it) and then tap on AirDrop. Select the name of the person’s device and the transfer will begin.

If you’re like me and find learning a new language is easier when you integrate it into everyday things (ie. purposefully changing the language of my phone) then this little genius tip might be great for you! Instead of changing the whole language on your iPhone, you can change the language only for a particular app.
HERE’S HOW!
Go to Settings > Tap on an App > Tap on Language > VOILA!
Please Note: Not all apps may have this function.
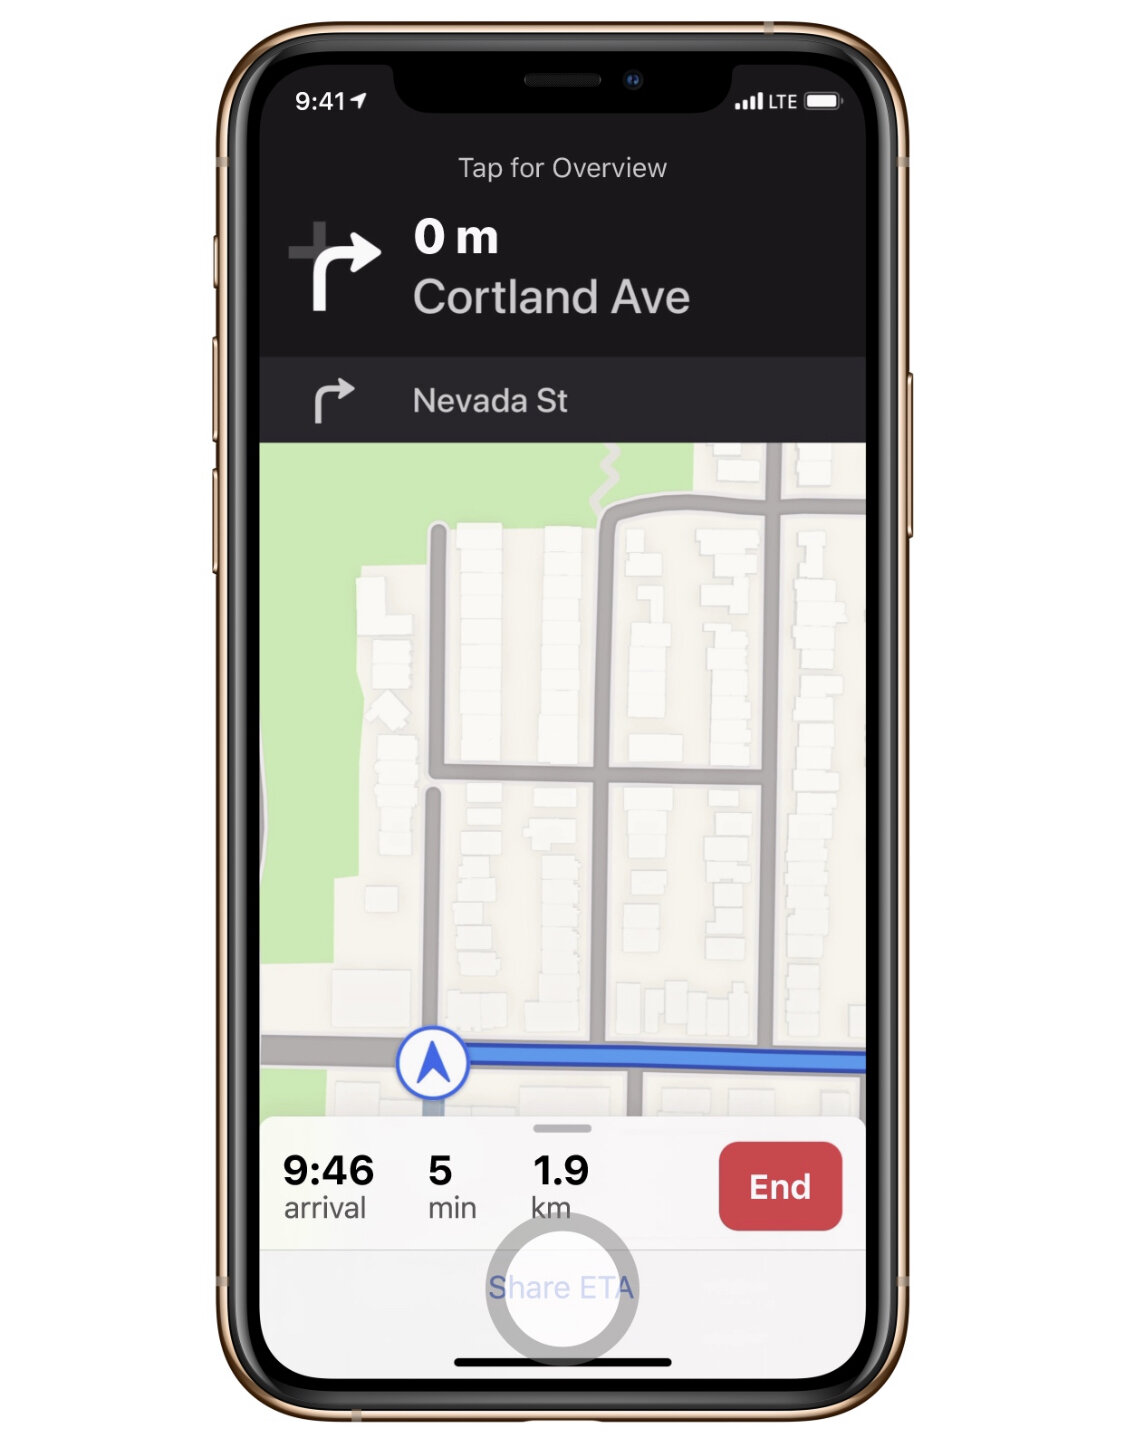
Here’s a quick iOS TIP for you in case you’re running a little late and you have friends who want to know how far away you are.
Open APPLE MAPS > Input your destination > Directions > GO > Tap on the bottom anchor which shows the ARRIVAL/MIN/KM > Tap on Share ETA > Select the contact you want to share it to.
So, as we know Apple had discontinued their Print Products in Photos. But no need to fear, there’s still plenty of third-party apps that work with Apple Photos to help you on your creative photographic projects! One of these is an app extension called Mimeo. Now, I’ve been using this extension for a while and even have had a few sit-down home sessions, in Perth, showing people how to organise, edit and print their travel adventures using Mimeo (click here if you’d like to book a session!). The print results are also amazing! So here’s a short video from Mimeo on how to build a photobook using their Photos plugin on Apple…
Let’s be honest here, as much as we want to have some semblance of parental control over what kids do on their iPhones, iPads or iPods they somehow have the knack of finding loopholes. Well, it’s time to fight back! Kidding…somewhat. But here are 3 loopholes that some smart alec kids have been able to find to bypass Apple’s Screen Time parental control feature and also their SOLUTIONS!

Photo by David Grandmougin on Unsplash
BYPASSING SCREEN TIME BY CHANGING THE TIMEZONE…
High-five the child for such a genius hack then take their phone off them
Disable Screen Time on their phone
Go to Settings > General > Date & Time > Enable “Set Automatically”
Enable Screen Time again and make sure you set the 4-digit Pass Code (remember it and hide it from the kids!)
Turn on “Content & Privacy Restrictions”
Go down and tap on “Location Services”
At the bottom you’ll see “System Services”
Enable “Setting Time Zone” and then go back
At the top of the “Location Services” screen, toggle on “Don’t Allow Changes” - This should grey out the options in System Services and “Setting Time Zone”
Now in Settings > General > Date & Time everything should be greyed out and the kid won’t be able to change anything!
MY KID CAN STILL USE THE APP EVEN THOUGH I’VE SET APP LIMITS!
This one is simple. One little switch makes the difference!
On their phone go to Settings > Screen Time > App Limits > Add Limit
Select a Category or individual App
Set the time limit and now make sure you enable “Block at End of Limit”
Done!
THEY’RE WATCHING YOUTUBE VIDEOS THROUGH THE iMESSAGE WIDGET!
What a little genius, but such genius must be squashed…
Settings > Screen Time > Content & Privacy Restrictions > Content Restriction > Enter Passcode > Web Content
Tick “Limit Adult Websites”
Under “NEVER ALLOW” add this web address - https://www.youtube.com - NO MISTAKES! COPY IT EXACTLY OR IT WON’T WORK!
You may also want to remove the iMessage app from the “Always Allowed” list…
Settings > Screen Time > Always Allowed > Remove it from the Allowed Apps by tapping on the red circle with the minus sign in the middle
It’s always a good habit to read something before clicking on anything. That’s usually the best first defense for yourself against any potential dangers to the security and privacy on your computer or iDevice. Majority of these scammers will usually try to gain access to your account via your email or even through an SMS. Let’s just be honest here, there is no privacy when it comes to how people can contact us. The days of having an unregistered number in the White Pages is long gone!
While going through my Apple Mail I so happened to come across this wonderful email that should’ve ended up in my spam/junk folder. Let’s see if you can determine whether it is fake or not…

Here’s the breakdown…
Apple would NEVER send you an email asking for your details or to change them
This was sent to an email which I don’t even have an Apple ID associated with
Count the spelling and gramatical errors
Lastly, as the subject line says…I don’t even own a Microsoft Edge, I’m 100% Apple!
So, this is quite an obvious fake email whose purpose is to gain access to your Apple ID. I can’t stress this enough, but to say READ THINGS CAREFULLY BEFORE YOU CLICK!
Here’s a quick tip from Apple if you’ve made a mistake in Notes or in iMessages, etc. With three fingers, swipe left to UNDO. Swipe right if your want to REDO.
Here’s a quick tip for you and your iPhone or iPad when sending emails from the geniuses at Apple. Need to quickly save an email draft? While writing an email, simply swipe down on the little anchor point at the top of that message. To retrieve it again just tap on the draft at the bottom.

If you’ve updated to the new iOS you might’ve noticed a new scroll bar while navigating through a page in Safari. Not only is it useful for seeing where you are on a page you can now use it to scroll faster! Have a crack at it by normally scrolling through a page, then tap and hold the scroll bar on the right and drag it up or down to scroll through the page. Also the faster you move the scroll bar the faster you will scroll through the page!

It’s hard to dial an emergency number in an emergency! But there is actually a quick way to make an SOS call on your iPhone. Here’s how you do it…

Access SOS on your iPhone by pressing and holding down the side button and either volume button. Your iPhone will then contact emergency services and also send a message to your emergency contacts in your Medical ID and Health app.
Once again, Apple is working on our iPhone battery woes! Now that iOS 13 is a little more ironed out with a few multiple updates to fix a few bugs, let’s talk about the changes they’ve made to help us with Battery Life.
We all get a little confused when it comes to charging our phone overnight, but look, you’re not going to overload your phone while your sleep and charge. So Apple has done this thing with your trickle-charging. Usually once our batteries charge to 100% it switches to trickle charging. What is trickle charging, you ask? Well, let’s ask Siri…

Hey Siri…
What’s trickle charging?
Using it’s AI magic your iPhone will learn your routine. Yes, your iPhone is stalking you, but it’s for the good of your battery! It will set up a routine of only charging your iPhone to 80%, switch to trickle charging, and then by learning your wake up time, it will charge up to 100% just as you wake and hit snooze.
Here’s how to activate it…
Settings > Battery > Battery Health > Turn ON Optimised Battery Charging.

If you’ve been checking your iPad for software updates (or you can turn it on automatically by going to Settings > General > Automatic Updates) you would have seen the newest iPadOS 13 update. Since it’s release there’s been 2 additional updates to fix a few bugs. But what are the new features in this update you ask? Here’s some of the new features you get from this update…
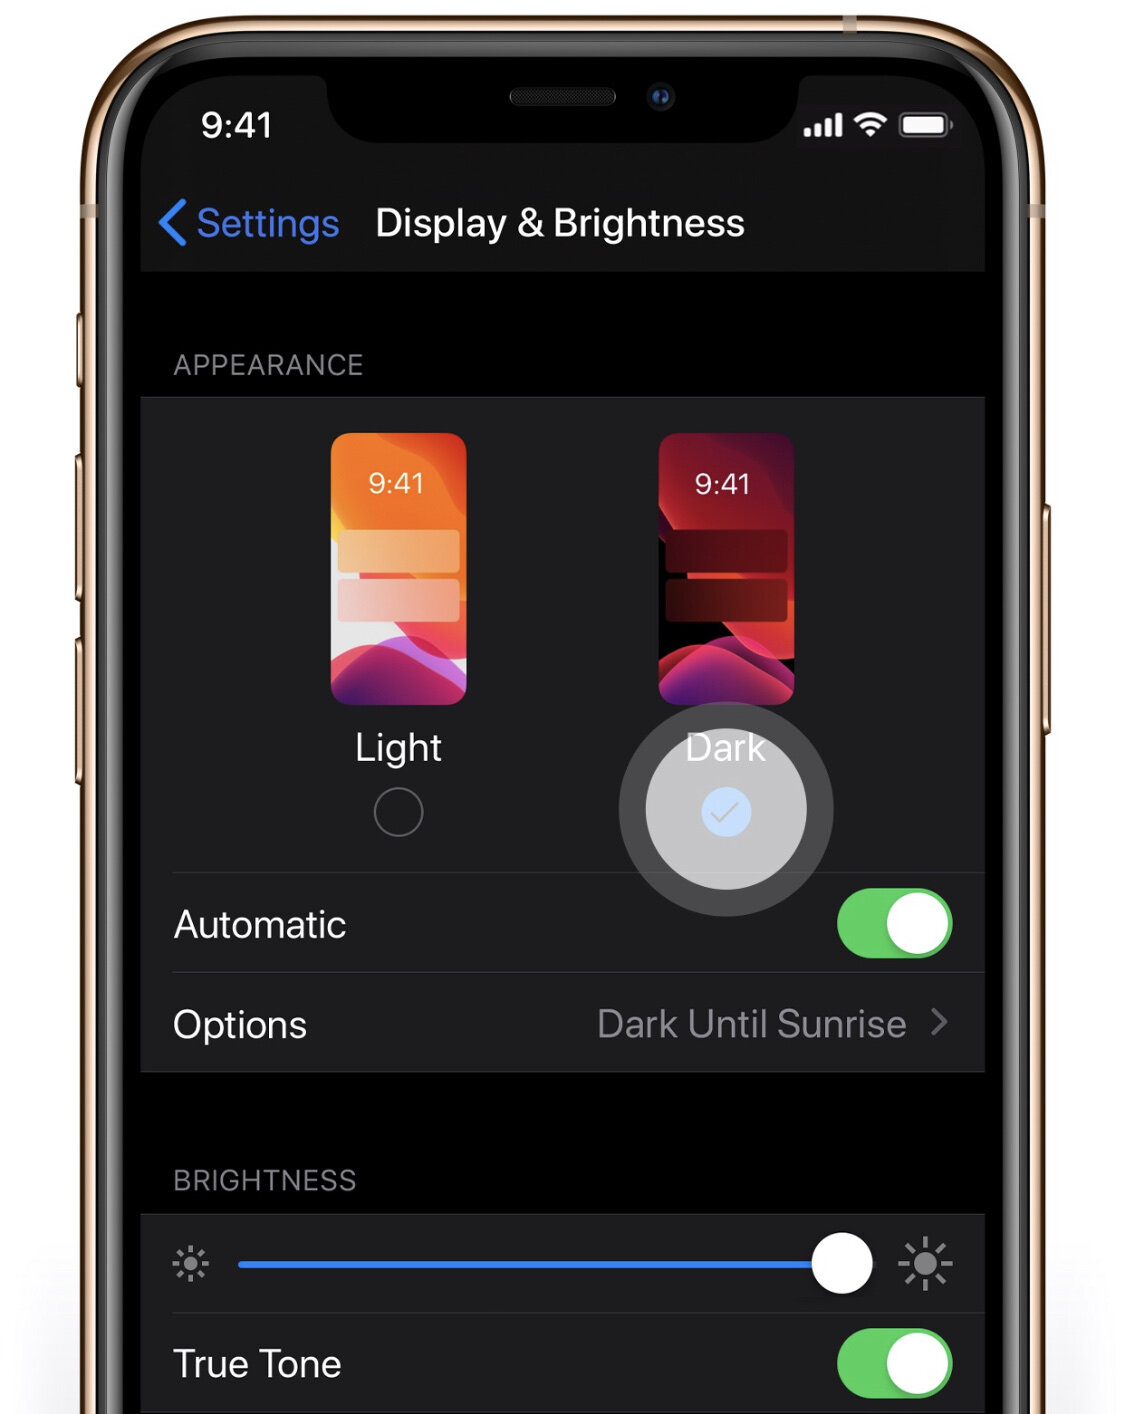
Firstly, let’s get this out of the way. Yes, Dark Mode is now not only on iOS 13, and OS X Mojave, but is also now on iPadOS. No more over-straining your eyes while you Netflix in bed at night! Although, we don’t encourage this; for a good night’s rest it’s best to stop using digital devices 1-2 hours before your bed time.
To set your iPad to Dark Mode simply go to Settings > Display & Brightness.
Who doesn’t like a nice workflow? With further improvements to their Split View and Slide Over Apple has brought up to another level by making it more intuitive. You can now have multiple apps at the ready in Slide Over, work with the same app in Split View (eg. Notes) and even use Exposé to see all your open spaces just like on MacOS!
Here’s a how to video from Apple Support on using Slide Over…
There’s been an update to the Homescreen. You can now pin your favourite Today view widgets so you can see them at a glance. To enable this go to Settings > Display & Brightness > Home Screen Layout > Keep Today View on Homescreen.

There is still so many more features that iPadOS has to offer! You can check out more them here on Apple’s website. You can also follow our posts via. Facebook as we look at different features of iOS 13, iPadOS and the upcoming OS X update to Catalina and give you a few tips and tricks.
iOS 13 is here and so is Dark Mode! You can switch from Light to Dark Mode straight away, automatically or schedule it. To set this go to Settings > Display and Brightness.
iOS 13 is finally here! Are you ready to experience a new level on your iPhone? Check out some of these features that you will find in iOS 13…

Dark Mode - See your iPhone in a new light! Dark Mode is finally here, designed to make screen viewing a little easier on your eyes. You can simply turn it on in your Control Centre or have it automatically turn on at night.
Portrait Mode - Yes, there’s new updates to make your portrait photos even more beautiful. The new update allows you to have more control over your light intensity with the new Portrait Lighting controls. You’ll also be able to create beautiful black-and-white portraits with the new High-Key Mono filter in Portrait Mode.
New tabs in Moments - A new way of organising your special moments into days, months and years.
New powerful editing tools for Photos and Video - Refine your photos a videos further with new and updated editing features. Need to rotate a video? You can finally do it with iOS 13!
Privacy and Security - Apple has always taken its Privacy and Security seriously so be prepared for a few upgrades here. One of the biggest updates is the introduction of "Sign In With Apple” which simplifies the way you can sign in to apps and websites with your privacy in mind.
These are only a few of the many new things in iOS 13. You can find out more here on Apple’s website. Don’t forget to make sure your phone is backed up before the update. Not sure if it is or how to? Go to your Settings > ‘Your Name’ > iCloud > iCloud Backup - check that this is on.
Here’s a quick Mac OS tip for you today to keep your desktop looking tidy.
Automatically hide the top menu bar by following these instructions…

Now whenever you bring your cursor to the top of your screen your menu will appear, and then disappear when you move away from it.
Are you finding a lot of spam notifications on your iPhone from Apple? Ie. Those pesky promo notifications telling you to set up Apple Pay or Apple Music. You may have tried checking your Notifcations settings to try and switch them off, but with no success. The truth is…the setting is somewhat…hidden. So here’s a step-by-step guide on how to get rid of the can of Spam on your iPhone, figuratively speaking…


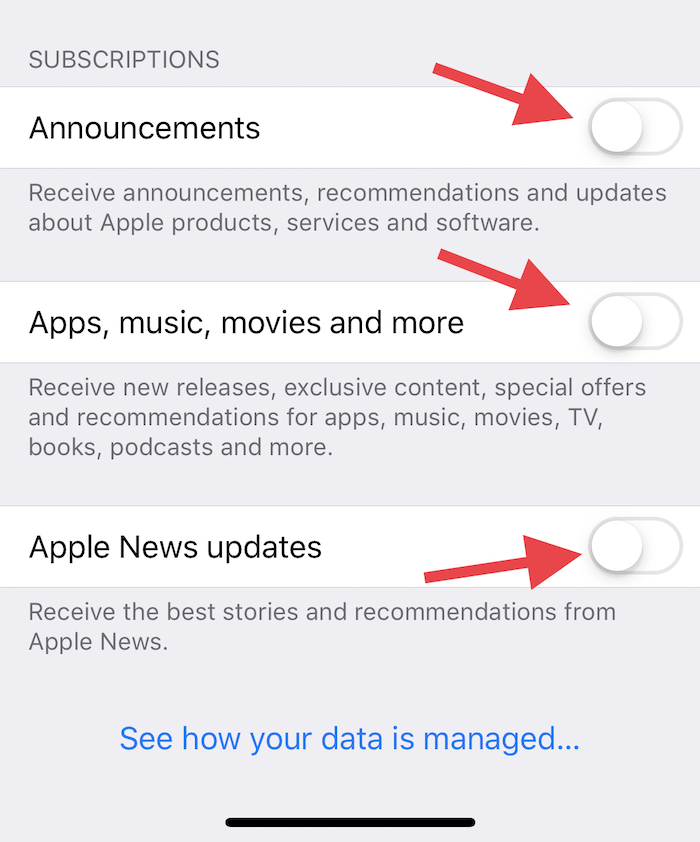
…And voila! That should cease all Apple spam notifications!
Setup Sync & Learn specialises in all Apple devices - help for setup, troubleshooting, and teaching technology in everyday language.
One on one or small group tailored training in the comfort of your own home or office. On-site help available in Sydney NSW and Perth WA.


My highlights from latest Apple Event September 2024