Is your Macbook's battery healthy?

Recently my MacBook Pro’s battery hasn’t been the best. While doing some work my fans started running at high-speed and I was afraid my MacBook Pro was about to lift-off and head to space. Thankfully it didn’t, instead I had a little pop-up warning about the excessive energy being used. This prompted me to check my battery health. So how does one check the health of their battery?

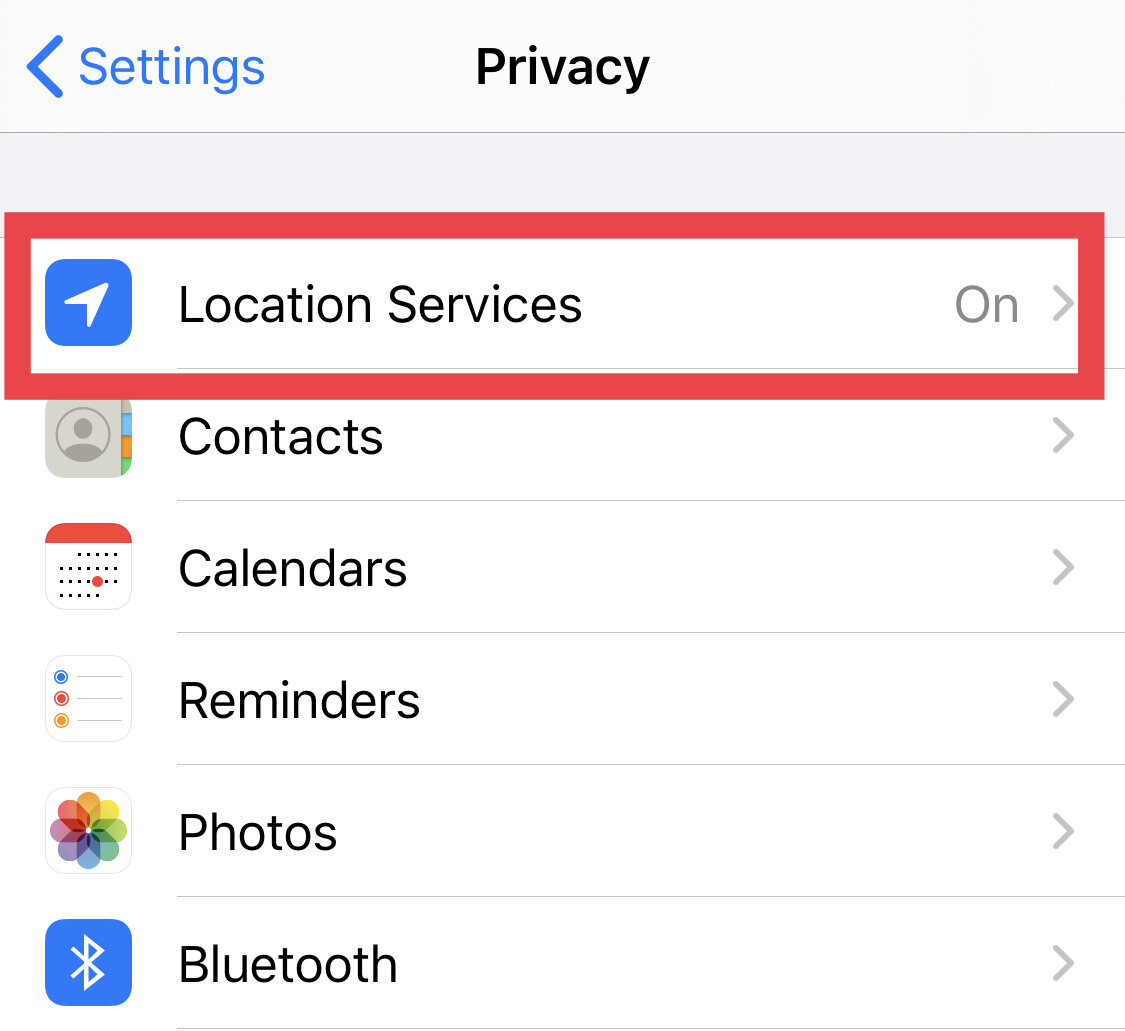
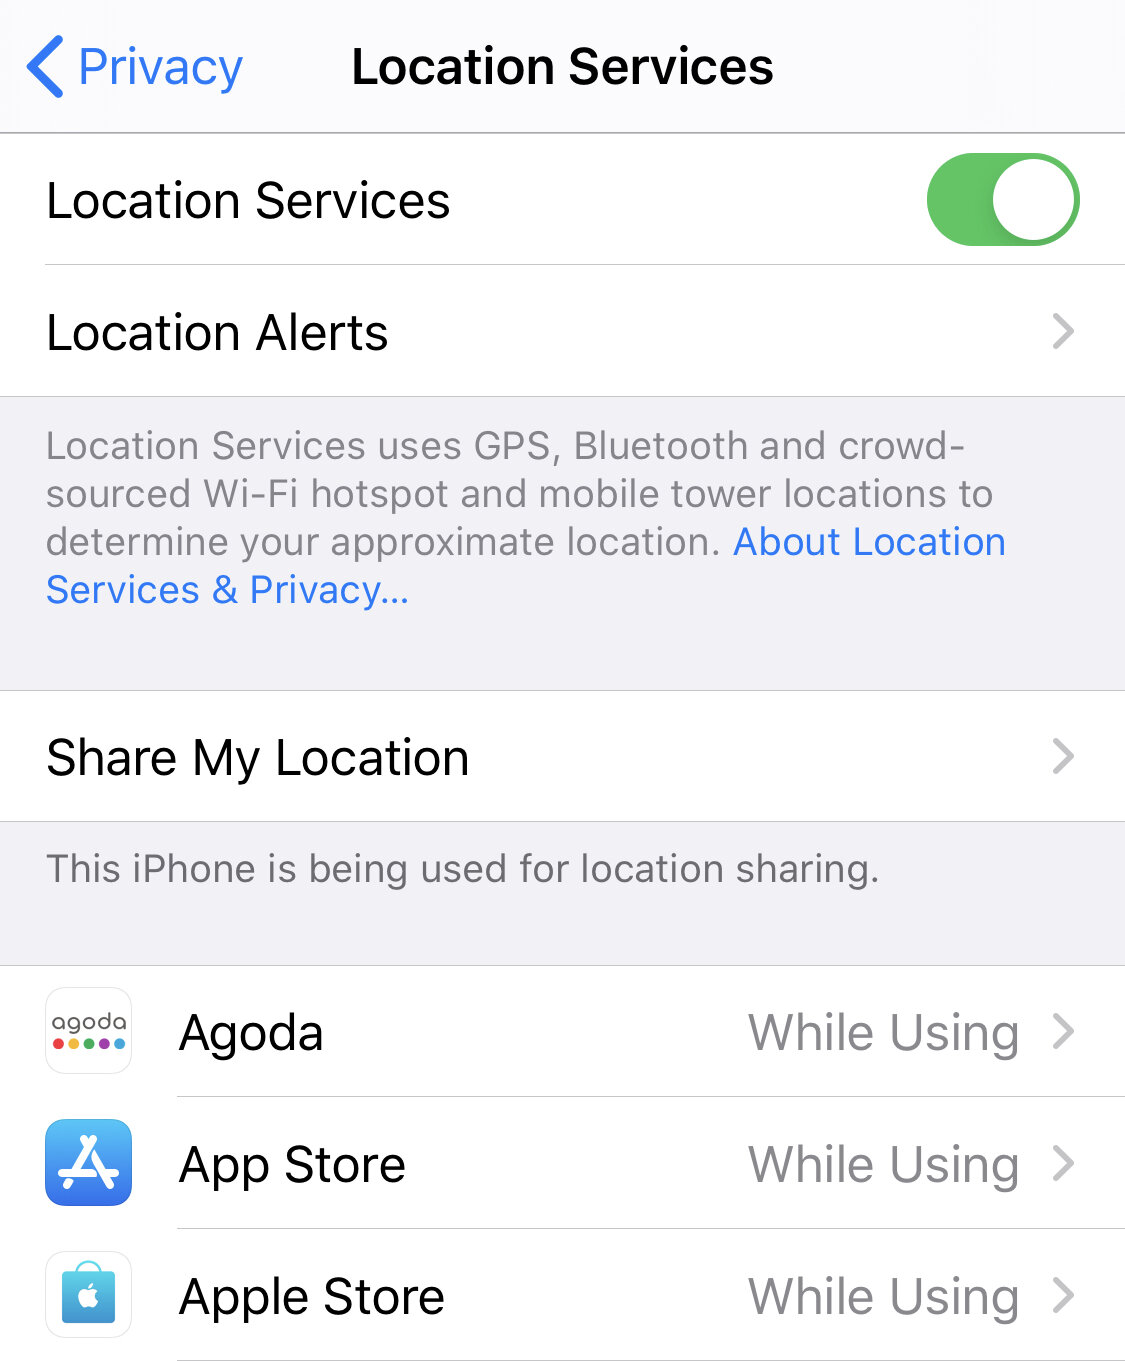
Make sure that you’ve updated your OS X to the latest - Catalina 10.15.5. Navigate to your System Preferences, click on Energy Saver, then click on Battery Health.

For my Mac, I had an alert that my battery needed to be serviced. After a short call, a quick online diagnostic, I was able to book in a work appointment to my local Apple store and got my battery replaced under warranty! Happy days! I could get back to work.

Photo by iabzd on Unsplash

Photo by iabzd on Unsplash

There is more that you can do to help preserve the life of your Macbook’s battery. You can find out more from the good folk here.

iOS Tip: How to disable Touch ID and Face ID

As much as I love the convenience of Touch ID and Face ID, there are times when I like using the good-old passcode way of unlocking my iPhone. This may be suitable for your situation too! Especially with winter coming around and your face is snugged up inside a warm scarf and your hands are hidden in a warm tech-friendly glove. Here’s how you can disable Touch/Face ID on your iPhone…

Navigate your way to your Settings > Touch ID & Passcode (alt. Face ID & Passcode) and then toggle off the little switches that enable Touch/Face ID for the different functions.

iOS TIP: How to quickly nest your lists in notes

It’s not just ‘swipe right’ for a particular social app, but you can also use this handy shortcut to nest your lists in Notes! I love how quick and simple it is to keep my plans and thoughts organised. Here’s how easy it is to sort your list out with just a swipe…

  1. Make your list in Notes as you would normally do, either using bullets, dashes or numbers, etc.

  2. When you reach the line on the list entry you want to nest just do a quick swipe on the bullet-point, dash or number to the right!

  3. Et voila! You’re now an organised, list-making pro

GIF: Killian Bell/Cult of Mac

GIF: Killian Bell/Cult of Mac

We hope you enjoyed this quick tip! If you want more, just give us a follow on our Facebook page. Got bigger questions or would like to learn more about your Apple device? Give us a shout to see how we can help you!

iOS TIP: Turn off Location Sharing

The team at Setup, Sync and Learn hope that you all are fairing well and are safe at the current time. Right now, we are so happy about the lightening of restrictions as Australia has successfully been flattening the curve. You may have heard that the government recently launched a new app called COVIDSafe. Prior to its release, it brought up many conversations about privacy. The thought of being “tracked” worried many people, but hopefully, the most recent news on the app has helped clear any misunderstandings, as the app doesn’t track your location. But, did you know there could be other apps on your phone that are tracking your location? Here’s where you can find out which apps have location sharing on, and how you can change their permissions…

Settings > Privacy > Location Services

HOW TO: Look good in a video call

Many of you may be finding yourselves working from home, posting all those selfies on social media with the hashtag #WFH (Working From Home). With social distancing having being implemented we find ourselves turning to virtual meetings via video calls. Despite not being able to be with one another physically, we do still want to look somewhat presentable! So here’s a fun article from Cult of Mac on 5 ways to look great on a video call. They bring up 5 tips to think about it…

  1. Lighting

  2. Camera Angle

  3. Your background

  4. Make-up?

  5. How to dress

Check out their article here.

HOW TO: Video-call using Group FaceTime

With the whole community in isolation it’s no wonder many people are turning to video-calling apps to keep in touch with one another. We know that Apple has FaceTime where we can do video and audio calls to our loved ones, but did you know you can also do GROUP FaceTime video/audio calls? Here’s a helpful guide from Apple Support on how to use Group FaceTime on your iPhone, iPad or iPod. If you own a Mac, they also have a learning guide here too. So get together with the family with a virtual gathering via. FaceTime. There’s also many fun things you can do with the Camera Effects.

how_to_start_a_group_facetime_call
how-to-add-camera-effects-to-group-facetime-call

iOS TIP: Swipe to Type

We’re always looking for a little more efficiency in life and sometimes we don’t notice the subtle changes Apple makes to help us along the way. If you’ve kept your iPhone updated you may have noticed a little something-something has been added to your keyboard. It’s been a long time coming, yes, I complained a little that Apple’s iOS was sooooo behind on this feature that has been around on other phone operating systems for a while, but alas the patience has paid off. So while you’re holding that reusable coffee cup in your left hand you can now swipe-to-type on your iPhone in the other hand, or the other way around, coffee in the right and phone in the left. How you ask? Well, if you’ve updated to the latest iOS 13 there’s no need to enable anything as the update would have automatically enabled it by default.

Image by Jéshoots from www.pexels.com

HOW TO DO IT?

To begin swiping-to-type, just place your finger (or thumb) on your keyboard screen and swipe it across the letters of the word you want to type. For example, for the word “Okay,” all you have to do is drag your finger/thumb over the respective letters in order “O-K-A-Y” and the keyboard will predict the word you’re trying to input.

We hope you enjoy this nifty iOS 13 feature as much as us!

iOS TIP: How to clean your iPhone and iPad properly

With the recent news about COVID-19 it sure is a good decision to take some precaution with the surfaces we come in contact with. Did you know that your iPhone or iPad may be dirtier than you think? Well, no need to freak out! The good folk at www.prevention.com has given you a simple and correct guide on how to clean your iPhone or iPad according to a Germ Pro. Make sure to read it through carefully as there are some things that can damage your device, as Apple have also mentioned themselves, where it can damage the finger-print resistant coating.

Prevention’s article gives you 5 easy steps to follow…

  1. Power down

  2. Opt for microfiber cloths

  3. Turn to rubbing alcohol

  4. Don’t use abrasive products

  5. Keep it clean

Learn more about the details by reading the article here, “How to Clean Your Cell Phone the Right Way, According to a Germ Expert” - By Elizabeth Millard.

Image by Burst from Pexels.

Image by Burst from Pexels.

iOS TIP: Sorry running late! How to share your ETA

Here’s a quick iOS TIP for you in case you’re running a little late and you have friends who want to know how far away you are.

Open APPLE MAPS > Input your destination > Directions > GO > Tap on the bottom anchor which shows the ARRIVAL/MIN/KM > Tap on Share ETA > Select the contact you want to share it to.

Share_Arrival_Time_Setup_Sync_Learn.jpeg

Photos: Creating a Photobook with Mimeo

So, as we know Apple had discontinued their Print Products in Photos. But no need to fear, there’s still plenty of third-party apps that work with Apple Photos to help you on your creative photographic projects! One of these is an app extension called Mimeo. Now, I’ve been using this extension for a while and even have had a few sit-down home sessions, in Perth, showing people how to organise, edit and print their travel adventures using Mimeo (click here if you’d like to book a session!). The print results are also amazing! So here’s a short video from Mimeo on how to build a photobook using their Photos plugin on Apple…

Your iPhone can help you in an emergency!

It’s hard to dial an emergency number in an emergency! But there is actually a quick way to make an SOS call on your iPhone. Here’s how you do it…

Adjustments.jpeg

Access SOS on your iPhone by pressing and holding down the side button and either volume button. Your iPhone will then contact emergency services and also send a message to your emergency contacts in your Medical ID and Health app.

iOS Quick Tip: It's all about that Battery Health

Once again, Apple is working on our iPhone battery woes! Now that iOS 13 is a little more ironed out with a few multiple updates to fix a few bugs, let’s talk about the changes they’ve made to help us with Battery Life.

We all get a little confused when it comes to charging our phone overnight, but look, you’re not going to overload your phone while your sleep and charge. So Apple has done this thing with your trickle-charging. Usually once our batteries charge to 100% it switches to trickle charging. What is trickle charging, you ask? Well, let’s ask Siri…

Hey Siri…

What’s trickle charging?

Using it’s AI magic your iPhone will learn your routine. Yes, your iPhone is stalking you, but it’s for the good of your battery! It will set up a routine of only charging your iPhone to 80%, switch to trickle charging, and then by learning your wake up time, it will charge up to 100% just as you wake and hit snooze.

Here’s how to activate it…

Settings > Battery > Battery Health > Turn ON Optimised Battery Charging.

Battery_Health_Screenshot_Setup_Sync_Learn.png

Mac OS Tip: Hide That Menu!

Here’s a quick Mac OS tip for you today to keep your desktop looking tidy.

Automatically hide the top menu bar by following these instructions…

Hide_Menu_Bar.png


SYSTEM PREFERENCES > GENERAL > ENABLE: “Automatically hide and show the menu bar”

Now whenever you bring your cursor to the top of your screen your menu will appear, and then disappear when you move away from it.

Quick iOS Tip: Access your favourite app with a swipe!

public.jpeg

Here’s a quick tip straight from the essentials of iOS! You can access your favourite App with just a swipe to the right and view its widget in your Today view. To add an App, find its icon, press down on it (with the 3D Touch), then tap on Add Widget.

public.jpeg

Now you’ll be able to quickly view the App from your Lock Screen by swiping right!

Quick iOS Tip: I’m still listening!

Sometimes you’re on a call and then someone else might walk in and want to start discussing something important, but then you may not want whoever is on the phone listening. Or you could be listening to that friend of yours venting, but secretly you’re watching Netflix in the background so you don’t want them to hear that background noise…okay, I’m kidding. We’re not that kind of friend. A friend must always be actively listening! But here’s how you mute yourself in a call. Just tap the mute button!

public.jpeg

Quick Tip: How to stop those pesky rate and review requests

We all have opinions, but sometimes we just want to enjoy ourselves without having to give feedback. So here’s a quick tip on how to stop those annoying rate and review pop-ups from apps that you’ve been using.

public.jpeg

Here’s where to go to disable those feedback requests!

Settings > iTunes & App Store and then tap the switch to toggle off In-App Ratings & Reviews.

How To: "Password-Protect" Apps using Screen Time

yura-fresh-1143650-unsplash(1).jpg

Did you know the Screen Time feature on your iPhone and iPad does more than just track how long you spend on various apps? Here’s a little hack on how you can use Screen Time as a way to password protect your apps…although I admit it just has one wee flaw.

Firstly, you’ll need to make sure you have Screen Time enabled by going to Settings > Screen Time and then set a passcode by tapping on Use Screen Time Passcode.

Now you’ll need to set a time limit for the apps you want to lock. What we are trying to do is set a minimum time limit so that the app will lock straight away (the minimum limit is 1 minute - this is the one flaw, as you’ll be “unprotected” until the app has been used for 1 minute).

To add a time limit to to an app, tap on the bar graph that shows your current day’s usage. Find the app you want to add a limit to in the list and tap on it. Next, tap on Add Limit and enter the passcode you set earlier in Screen Time. Set it to 1 minute and make sure you have enabled Block at End of Limit. Now tap on Add. Voila! Now after using your app for 1 minute it will lock - the icon will be greyed out on your home screen. When you tap on the greyed out icon you’ll get this message, “Ask For More Time” which you just tap on and enter your Screen Time passcode to unlock.

So, there you have it! A little Screen Time hack to “Password Protect” your apps!

Mojave's Dynamic Desktop

If you haven’t already, it’s a good time to update your Mac to Apple’s latest OS X Mojave (check if your Mac is compatible here). One of my favourite features is Mojave’s dynamic desktop. Now, it’s not a “life-changing” feature, but more of a fun novelty. Based off your location, your desktop background will change accordingly to the time of the day - so you’ll see a progression from day to night. Pretty cool right?

Curious? Here’s how to enable Dynamic Desktop for you Mac…

Dynamic_Desk01.jpeg

System Preferences > Desktop & Screen Saver > Desktop > Click on the drop-down menu and select Dynamic

…and you’re done!

You can also find and download more dynamic desktops online, or if you’re adventurous enough, make your own. I hope you find this feature just as interesting as I do!

How To: Using iOS 12's Passwords & Accounts Tool to Autofill

Okay, let’s be honest here, we’re all a little bit aware that we tend to forget our passwords especially with so many multiple logins. The good thing is that Apple has made it easier for us by giving us iCloud Keychain, which helps to store our usernames and passwords safely.

eleven-x-648723-unsplash.jpg

STORING YOUR PASSWORDS is pretty easy with Apple iCloud Keychain. All you have to do is log in to one of your apps or a website and a pop-up will ask if you want to save these login details to your iCloud Keychain. Select Save Password and voila! Your details are now added to your Keychain.

If you want to view your stored passwords in your Keychain simply go to your Settings > Passwords & Accounts > Website & App Passwords. Once you’ve confirmed your ID with either Touch/FaceID you’ll be able to see your full list of login info.

CREATING A STRONG PASSWORD is good practice. Most of us are guilty of creating very easy passwords (usually the name of our favourite pet and someone’s year of birth, or the most common, “Password”) iCloud Keychain thankfully has an option to create a strong password for you. So whenever your register for an app or register for anything on Safari, iOS 12 will suggest a Strong Password for you, which is then saved to your Keychain. So the next time your signing up to something new, you’ll see a pop-up which will then have the option “Use Strong Password.”

If this isn’t working for you, check that you have Autofill Passwords enabled. Settings > Passwords & Accounts > Autofill Passwords. Check that you have iCloud Keychain enabled as well.

AUTOFILL your passwords now whenever you’re logging in! Tap on the username or password box when logging into an app or website and if iOS detects that you’ve saved a login for the app or site, it’ll suggest a login just above your keyboard. Once you’ve selected the appropriate login, you just have to confirm using Touch/FaceID and your login details will be automatically filled out. Next step, tap on login!

How easy is that? No more trying to scramble your brain remembering multiple logins and passwords. There are many other apps that can help you with password management. I myself personally use 1Password. It’s a great little app that stores not only just your login details, but also other things such as your bank details, membership card details, credit card details. The sky’s the limit with what you want to store in it. You can check it out here on the app store. If you’re not a fan of a paid subscription though, there are also free alternatives. Explore Apple’s App store and see what you’ll discover!