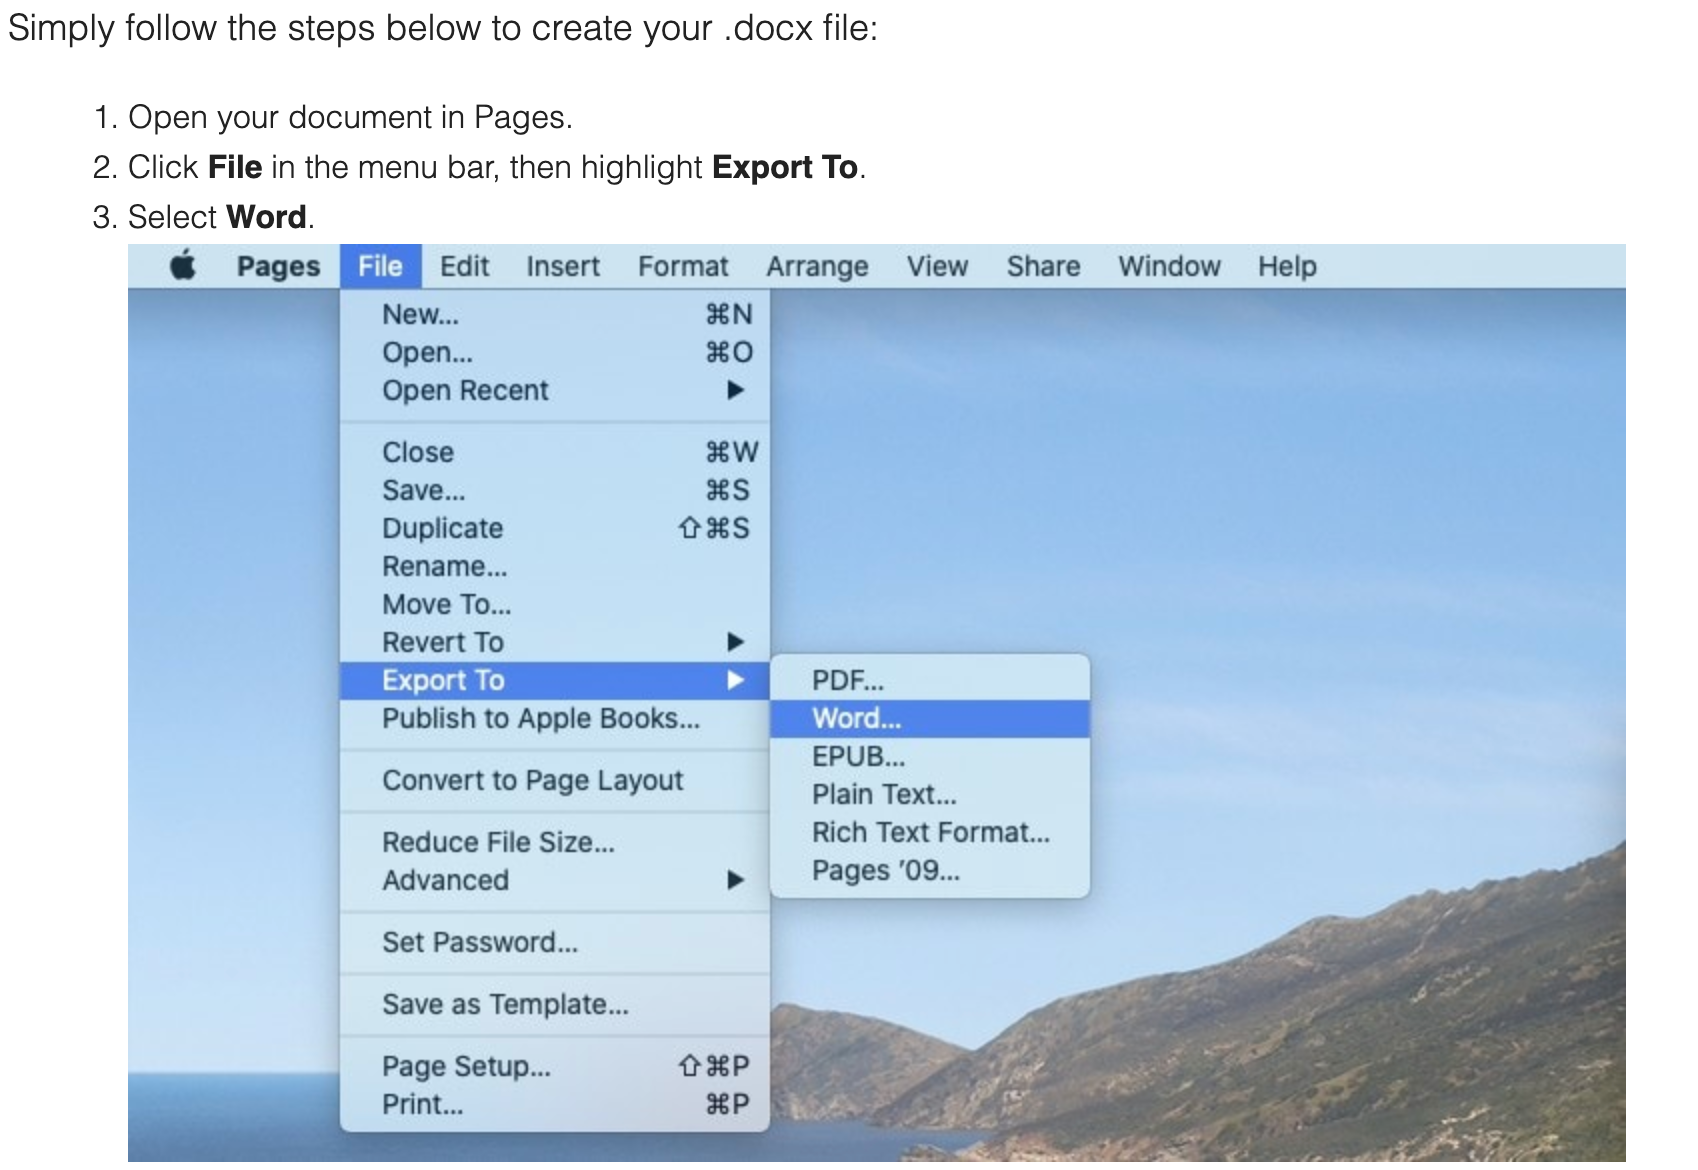
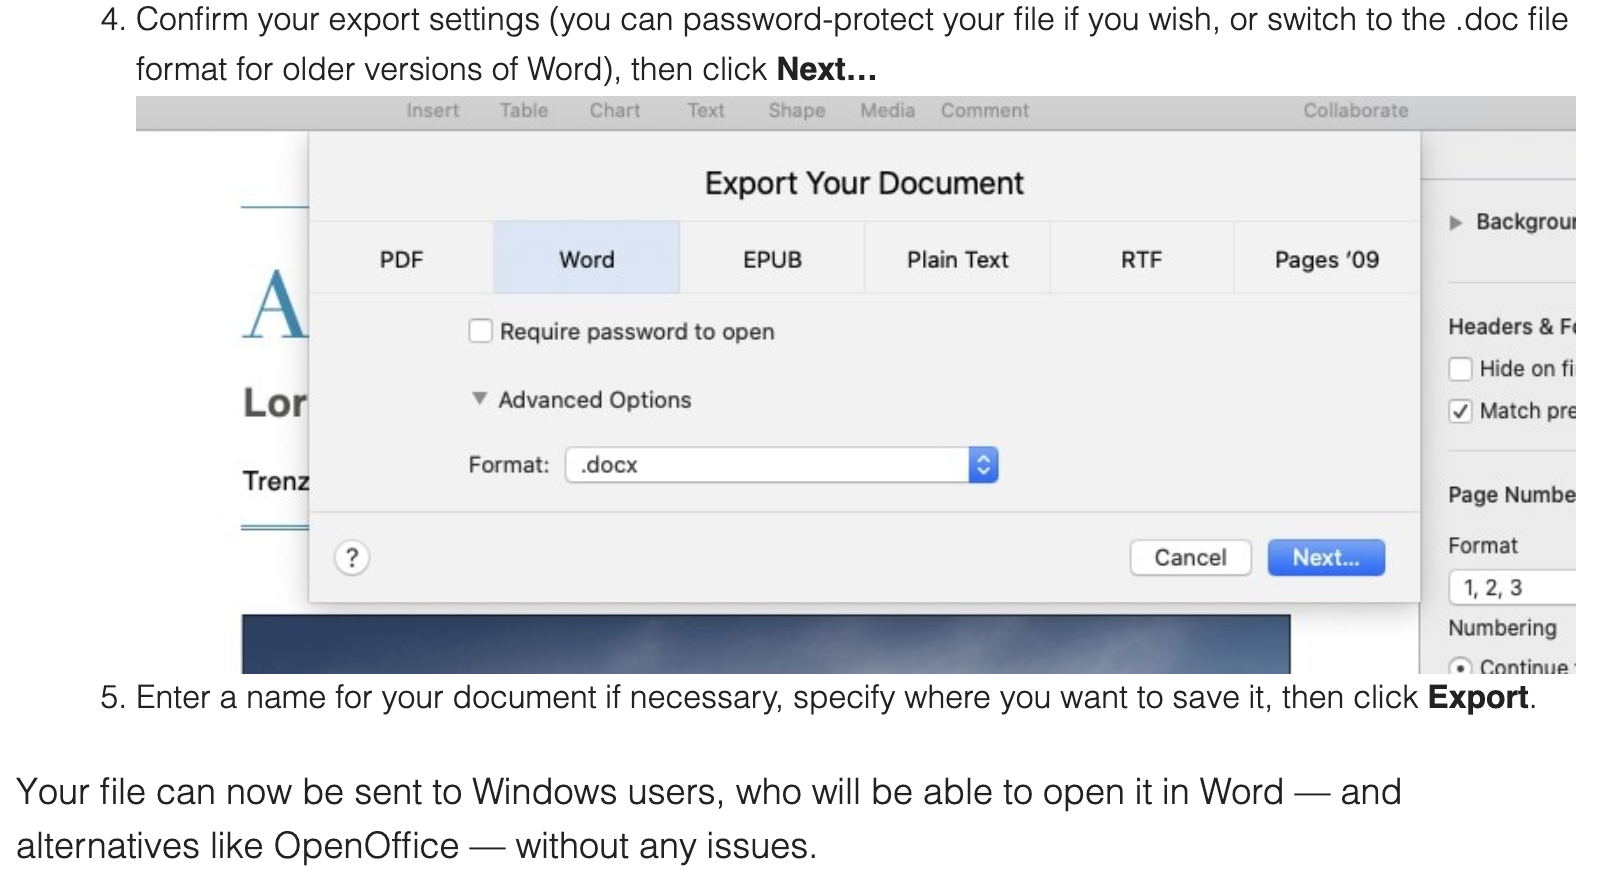
How To: Export your Pages document as a Word document.

Not everyone owns a Mac and when it comes to sharing documents it can become quite a hassle if you’re sharing it with someone who only has Microsoft Word. The good news is, Pages is Word friendly! Unlike Microsoft Word that can’t open Pages documents, Pages can both read and export .docx files! Here’s how you can export a Word friendly document for your Windows wielding friend thanks to the smart fellows at Cult of Mac.


Apple Tip: How to restore your contacts

Whether it’s absent mindedness or a slip of the finger, you may find yourself accidentally deleting a contact or two. No need to fear though if you’ve got backup enabled on your iCloud. Here’s how you can recover your contacts…

IMG_0724.jpg
  1. Log into your iCloud account using your Apple ID

  2. Scroll down to where it says Advanced and click on Restore Contacts

  3. Then select an archive of your contacts that was from a date before you had accidentally removed/lost the contacts

IMG_0727.jpg
IMG_0728.jpg

iOS TIP: Swipe to Type

We’re always looking for a little more efficiency in life and sometimes we don’t notice the subtle changes Apple makes to help us along the way. If you’ve kept your iPhone updated you may have noticed a little something-something has been added to your keyboard. It’s been a long time coming, yes, I complained a little that Apple’s iOS was sooooo behind on this feature that has been around on other phone operating systems for a while, but alas the patience has paid off. So while you’re holding that reusable coffee cup in your left hand you can now swipe-to-type on your iPhone in the other hand, or the other way around, coffee in the right and phone in the left. How you ask? Well, if you’ve updated to the latest iOS 13 there’s no need to enable anything as the update would have automatically enabled it by default.

Image by Jéshoots from www.pexels.com

HOW TO DO IT?

To begin swiping-to-type, just place your finger (or thumb) on your keyboard screen and swipe it across the letters of the word you want to type. For example, for the word “Okay,” all you have to do is drag your finger/thumb over the respective letters in order “O-K-A-Y” and the keyboard will predict the word you’re trying to input.

We hope you enjoy this nifty iOS 13 feature as much as us!

iOS TIP: How to clean your iPhone and iPad properly

With the recent news about COVID-19 it sure is a good decision to take some precaution with the surfaces we come in contact with. Did you know that your iPhone or iPad may be dirtier than you think? Well, no need to freak out! The good folk at www.prevention.com has given you a simple and correct guide on how to clean your iPhone or iPad according to a Germ Pro. Make sure to read it through carefully as there are some things that can damage your device, as Apple have also mentioned themselves, where it can damage the finger-print resistant coating.

Prevention’s article gives you 5 easy steps to follow…

  1. Power down

  2. Opt for microfiber cloths

  3. Turn to rubbing alcohol

  4. Don’t use abrasive products

  5. Keep it clean

Learn more about the details by reading the article here, “How to Clean Your Cell Phone the Right Way, According to a Germ Expert” - By Elizabeth Millard.

Image by Burst from Pexels.

Image by Burst from Pexels.

iOS TIP: Share using AirDrop

Recently I’ve found myself doing quite a bit of sharing photos and Safari links from my iPhone to another iPhone or to a Mac. If you’re still trying to share files by iMessage or Mail to other Apple users you may not be aware of Apple’s sharing feature, AirDrop! So here’s how to use AirDrop thanks to Apple’s Genius Picks.

All you have to do is tap on the Share Icon (a square icon with an arrow pointing up out of it) and then tap on AirDrop. Select the name of the person’s device and the transfer will begin.

Adjustments.jpeg

iOS Quick Tip: Saving Email Drafts

Here’s a quick tip for you and your iPhone or iPad when sending emails from the geniuses at Apple. Need to quickly save an email draft? While writing an email, simply swipe down on the little anchor point at the top of that message. To retrieve it again just tap on the draft at the bottom.

Adjustments.jpeg

iOS Quick Tip: Scroll Bar

If you’ve updated to the new iOS you might’ve noticed a new scroll bar while navigating through a page in Safari. Not only is it useful for seeing where you are on a page you can now use it to scroll faster! Have a crack at it by normally scrolling through a page, then tap and hold the scroll bar on the right and drag it up or down to scroll through the page. Also the faster you move the scroll bar the faster you will scroll through the page!

Adjustments.jpeg

Your iPhone can help you in an emergency!

It’s hard to dial an emergency number in an emergency! But there is actually a quick way to make an SOS call on your iPhone. Here’s how you do it…

Adjustments.jpeg

Access SOS on your iPhone by pressing and holding down the side button and either volume button. Your iPhone will then contact emergency services and also send a message to your emergency contacts in your Medical ID and Health app.

Quick iOS Tip: Access your favourite app with a swipe!

public.jpeg

Here’s a quick tip straight from the essentials of iOS! You can access your favourite App with just a swipe to the right and view its widget in your Today view. To add an App, find its icon, press down on it (with the 3D Touch), then tap on Add Widget.

public.jpeg

Now you’ll be able to quickly view the App from your Lock Screen by swiping right!

Quick iOS Tip: I’m still listening!

Sometimes you’re on a call and then someone else might walk in and want to start discussing something important, but then you may not want whoever is on the phone listening. Or you could be listening to that friend of yours venting, but secretly you’re watching Netflix in the background so you don’t want them to hear that background noise…okay, I’m kidding. We’re not that kind of friend. A friend must always be actively listening! But here’s how you mute yourself in a call. Just tap the mute button!

public.jpeg

Quick Tip: How to stop those pesky rate and review requests

We all have opinions, but sometimes we just want to enjoy ourselves without having to give feedback. So here’s a quick tip on how to stop those annoying rate and review pop-ups from apps that you’ve been using.

public.jpeg

Here’s where to go to disable those feedback requests!

Settings > iTunes & App Store and then tap the switch to toggle off In-App Ratings & Reviews.

Mojave's Dynamic Desktop

If you haven’t already, it’s a good time to update your Mac to Apple’s latest OS X Mojave (check if your Mac is compatible here). One of my favourite features is Mojave’s dynamic desktop. Now, it’s not a “life-changing” feature, but more of a fun novelty. Based off your location, your desktop background will change accordingly to the time of the day - so you’ll see a progression from day to night. Pretty cool right?

Curious? Here’s how to enable Dynamic Desktop for you Mac…

Dynamic_Desk01.jpeg

System Preferences > Desktop & Screen Saver > Desktop > Click on the drop-down menu and select Dynamic

…and you’re done!

You can also find and download more dynamic desktops online, or if you’re adventurous enough, make your own. I hope you find this feature just as interesting as I do!

2 Easy Steps To Keep Your Device Up To Date With Security

In the past days you may have heard news of the recent cyber attack that disabled computers in Britain’s National Health Service, Russia’s Interior Ministry, various companies, and homes across numerous countries (read more about it here). Thankfully this attack did not affect any Apple operating systems, which proves evermore why it’s so important to keep your iOS and OS X devices up to date always!

  1. BACK IT UP!  - The last thing you want is to lose all your data and documents if your system get compromised, so always make a habit of backing up your devices. It’s not too hard to get it done either! With your iPhone or iPad it’s easy to back up your contacts and other settings via iCloud…

SETTINGS > iCLOUD > iCLOUD BACKUP (enable)

I personally believe the best way to back up your iPhone/iPad is to manually back it up via iTunes. Here’s how you can do it…

On your Mac you can back it up by using Time Machine…

  1. KEEP IT UPDATED! - The one excuse you can’t give is that you didn’t know there was an update. A lot of the time when there is a new update to an iPhone, iPad, or Mac you get a pop-up notification. Truth is, I know most of you ignore this! Please don’t, as these updates contain the latest security measures against any undesirables from hacking your device.

It’s quite easy to make sure you have the latest updates…

On your iPhone/iPad navigate your way to your device’s SETTINGS > GENERAL > SOFTWARE UPDATE

For Mac computers… Click on the Apple symbol at the top left of your screen > ABOUT THIS MAC > OVERVIEW > SOFTWARE UPDATES

**Be sure to backup everything before doing any updates!

So, to keep your devices safe make it a habit to backup and update whenever you can!

This Week's Video Tip: How To Manually Back Up Your iDevices

Apple's iOS 10.3 update is coming soon and it looks like it's going to be packed with quite a few new things. This is a great time to make sure that you have your iPhone or iPad manually backed up to your computer using iTunes. Though you may have your iPhone or iPad backed up to iCloud it is still good practice to do a manual back up as this backs EVERYTHING up! So just in case anything might go wrong during the update to the new iOS watch this week's video tip to find out how to manually back up all your contacts, settings and data from your iPhone/iPad...